An
environment variable in a named object containing data which can be
used by multiple applications or processes. Basically, it is just a
variable with a name and an associated value. It can be used to
determine anything like location of executable files, libraries, current
working directory, default shell, or local system settings.
For
those new to mac can get overwhelmed with how to set up and manage
these environment variables. This guide provides easy ways to do so.
Displaying current Environment Variables
This is very easy. Just open the Terminal and run the command printenv as shown below.
Setting temporary environment variable using terminal
If
the environment variable you wish to set is to be used once or twice,
you would like to set a temporary variable for it, avoiding unwanted
variables staying in the system. You can do this simply by opening the
terminal and running export command followed by the variable name and its value.
The above example sets the variable $JAVA_HOME
to the specified value. However, if your requirement is to append a
value to an existing environment variable, then assign the value as
Setting permanent environment variable using terminal
Since Mac uses bash shell, so the environment variables can be added to the .bash_profile directory, for the current user. The path to this file can be found using the command
HIMANSHUs-MacBook-Pro:~ himanshu$ ~/.bash_profile
Get
started by opening this file using a text editor. I’m using nano — a
terminal based text editor, you may use any text editor you like — to
open the file and edit it.
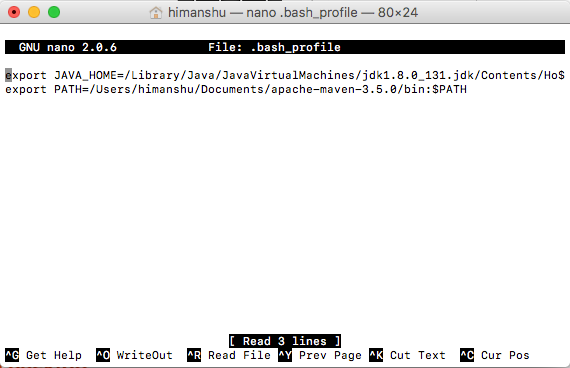
This will open the .bash_profile file in the terminal.
Note: If there is no file named .bash_profile, then this above nano command will create a new file named .bash_profile .
Now move to the end of the file, go to the next line. Now add the desired environment variables using export command as we did before.
Press ctrl+X to exit the editor. Press ‘Y’ for saving the buffer, and you will return back to the terminal screen.
We are done now!
You may again run echo $[variable_name] to see the value of your just saved environment variable.
UPDATE:
Don’t forget to close and reopen the terminal before using your newly
set environment variable. Reopening the terminal loads the
updated .bash_profile file.
The very last hash next to the folder name is the one you want, let's call it $SITE_HASH for now.
Now, you can test it out locally by opening http://localhost:8080/ipfs/$SITE_HASH in your web browser! Next, to view it coming from another ipfs node, you can tryhttp://gateway.ipfs.io/ipfs/$SITE_HASH. Cool, right? But those hashes are rather ugly. Let's look at some ways to get rid of them.
First, you can do a simple DNS TXT record, containing dnslink=/ipfs/$SITE_HASH. Once that record propagates, you should be able to view your site athttp://localhost:8080/ipns/your.domain. Now that's quite a bit cleaner. You can also try this on the gateway at http://gateway.ipfs.io/ipns/your.domain
Next, you might be asking "well what if i want to change my website, DNS is slow!" Well let me tell you about this little thing called Ipns (note the 'n'). Ipns is the Interplanetary Naming System, you might have noticed the above link has /ipns/ instead of /ipfs/. Ipns is used for mutable content in the ipfs network, it's relatively easy to use, and will allow you to change your website without updating the dns record every time! So how do you use it?
After adding your webpage, simply do:
$ ipfs name publish $SITE_HASH
Published to <your peer id>:/ipfs/$SITE_HASH
(Disclaimer: When using IPNS to update websites, it's important to think about that assets could be loaded from two different resolved hashes when updating your website, leading to outdated/missing assets unless accounted for)
Now, you can test that it worked by viewing: http://localhost:8080/ipns/. And also try the same link on the public gateway. Once you're convinced that works, let's again hide the hash. Change your DNS TXT record to dnslink=/ipns/<your peer id>, wait for that record to propagate, and then try accessing http://localhost:8080/ipns/your.domain.
At this point, you have a website on ipfs/ipns, and you may be wondering how you could expose it at http://your.domain, so that the Internet users of today may access it too without them having to know about any of this. It's actually surprisingly simple to do, all you need for this is your previously created TXT record and to point the A record of your.domain to the IP address of an ipfs daemon that listens on port 80 for HTTP requests (such as gateway.ipfs.io). The users' browsers will send your.domain in the Host header of the requests, and you have your dnslink TXT records, so the ipfs gateway will recognize your.domain as an IPNS name, and so it will serve from under /ipns/your.domain/ instead of /.
So, if you point your.domain's A record to the IP of gateway.ipfs.io, and then wait for the DNS to propagate, then anyone should be able to access your ipfs-hosted site without any extra configuration simply at http://your.domain.
Alternatively, it is possible to use CNAME records to point at the DNS records of the gateway. This way, IP addresses of the gateway are automatically updated. Note however that CNAME records to not allow for other records, such as a TXT to refer to the ipfs/ipns record. Because of this, ipfs allows to create a DNS TXT record for _dnslink.your.domain with dnslink=/ipns/<yourpeer id>.
So by creating a CNAME for your.domain to gateway.ipfs.io and adding a _dnslink.your.domain record with dnslink=/ipns/<your peer id> you can host your website without explicitly referring to IP addresses of the ipfs gateway.
ipfs desktop, before 0.6.1, need update config.json the new ipfs_repo
after 0.7, no need update here, because desktop will use whatever ipfs daemon use ipfs_repo path
The configuration file and logs are located on ~/Library/Application Support/IPFS Desktop on macOS and %appdata%/IPFS Desktop on Windows. For quick access to this folders, just right-click on your tray icon and then 'Logs Directory' or 'Configuration File', depending on what you want.
bills-mac-mini:~ Bill$ cd go-ipfs
bills-mac-mini:go-ipfs Bill$ ls
LICENSE README.md build-log install.sh ipfs
bills-mac-mini:go-ipfs Bill$ ./install.sh
We cannot install ./ipfs in one of the directories /usr/local/bin /usr/bin
It seems that we do not have the necessary write permissions.
Perhaps try running this script as a privileged user:
sudo ./install.sh
=======================
reason is you do not have /usr/local/bin folder, you need manually create one, then run again.
or you could just manually copy ipfs.exe to /usr/local/bin.
open install.sh, see, it copy over file with mv.......
cd /
cd usr/local
sudo mkdir bin
another terminal,
bills-mac-mini:~ Bill$ cd go-ipfs
bills-mac-mini:go-ipfs Bill$ ./install.sh
success.
2) install ipfs desktop for mac
unzip,
open, you see ipfs icon show at task bar
But on windows, ipfs icon do not show on task bar, but you can see ipfs process at task manager.
Once you've added a directory, you can get the hashes of the files in the directory by running either:
ipfs files stat --hash /ipfs/DIR_HASH/path/to/file` to get the hash of an individual file.
ipfs ls /ipfs/DIR_HASH` to list the hashes/names of all the files in a directory.
Note: If you're adding a massive directory, you'll need to enable (directory sharding](https://github.com/ipfs/go-ipfs/blob/master/docs/experimental-features.md#directory-sharding--hamt) (which is an experimental feature).
+++++++++++++++++++++++++++++++++++++++++++++++
for Mac only,
/users/bill/.bash_profile
edit this file,
sudo nano .bash_profile
export IPFS_PATH=/Volumes/ipfs1/ipfs_repo
sudo launchctl limit maxfiles 65536 200000
when finish edit, ctrl+x, Y, Enter
+++++++++++++++++++++++++++++++++++++++++
By default, ipfs daemon will create a hidden folder repo folder at
your-user-home/.ipfs
if you want it change to D drive, D volume,
You have to set (windows) IPFS_PATH=D:/ipfs_repo
(mac) export IPFS_PATH=/Volumes/ipfs1/ipfs_repo
If you want ipfs-desktop use new ipfs_repo, you have to do following
...............
Windows:
ipfs repo
will list all help
ipfs repo stat
will list current repo path ( which read from IPFS_PATH=D:/ipfs_repo environment variable)
default is (c:/users/you/.ipfs)
Before you run ipfs daemon or ipfs desktop, you need to set ipfs repo(block, datastore etc)
run
ipfs init
will use your current ipfs_path as repo location.
Now you are ready to run ipfs daemon,
Because of bug of ipfs desktop, you need to manually config new repo_path, othewise, it always use default \.ipfs
I can manually update config.json file, let it point to customized ipfs repo directory.
It works fine.
On windows,
C:\Users\your-user-name-here\AppData\Roaming\IPFS Desktop
The configuration file and logs are located on ~/Library/Application Support/IPFS Desktop on macOS and %appdata%/IPFS Desktop on Windows. For quick access to this folders, just right-click on your tray icon and then 'Logs Directory' or 'Configuration File', depending on what you want.
How do we select the IPFS repo location?
We use ipfsd-ctl, which, in default conditions, will check IPFS_PATH environment variable. If not set, we fallback to $HOME/.ipfs. As soon as the first run has succeded, we save the information about the repository location in the configuration file, which becomes the source of truth.
Which version of IPFS are we running?
Since we're using ipfsd-ctl, we have our own embedded IPFS binary. We try to always have the latest version.
Which flags do we use to boot IPFS?
By default we use the flags --migrate=true --routing=dhtclient ----enable-gc=true when running the IPFS daemon. They can be changed via the configuration file, which can be easily accessed as mentioned above.
.................. note ................................................................................
when ipfs runing, repo.lock file will show in ipfs_repo directory,
if ipfs is down, repo.lock will disappear.
but some time, a old repo.lock file in ipfs repository folder will cause error, failed to start ipfs daemon
To remove repo.lock file
ipfs repo (list help)
ipfs repo fsck ( will remove the repo.lock file)
.................................................................................
++++++++++++++++++++++++++++++++++++++++++++++
change ipfs repo to other disk:
ipfs daemon, will look for IPFS_PATH environment variable, to decide where put ipfs repository.
.........................................
Customize ipfs repo to another disk, by set IPFS_PATH environment variable.
Windows,
add system environment variable
IPFS_PATH=D:\ipfs_repo
Mac,
terminal run 'env' or 'printenv'
will list all environment variable,
if no IPFS_PATH=/Volumes/d/ipfs_repo
you need to set.
for 1 time temporary , cmd run
export IPFS_PATH=/Volumes/d/ipfs_repo
If you want permanent set this, do this: Mac uses bash shell, so the environment variables can be added to the .bash_profile directory, for the current user This file at : user$ ~/.bash_profile Open and edit this file: user$ nano .bash_profile write: export IPFS_PATH=/Volumes/d/ipfs_repo
Press ctrl+X to exit the editor. Press ‘Y’ for saving the buffer, Press "Enter" to return cmd.
added QmcXbRoSrnmqwVFms3t9iX6DZMtKfUB9PJj6j8HQp59Ubj fileRestAPI Your hash ID is above 2) ipfs name publish QmcXbRoSrnmqwVFms3t9iX6DZMtKfUB9PJj6j8HQp59Ubj Published to QmbX1mn42J9Fh7ascyaX2txtqRxRNFg3NWMXFr8k6HqKBj: /ipfs/QmcXbRoSrnmqwVFms3t9iX6DZMtKfUB9PJj6j8HQp59Ubj
You get your peer ID above
Test by name resolve below:
3) ipfs name resolve QmbX1mn42J9Fh7ascyaX2txtqRxRNFg3NWMXFr8k6HqKBj
/ipfs/QmcXbRoSrnmqwVFms3t9iX6DZMtKfUB9PJj6j8HQp59Ubj
you can test web site at
https://ipfs.io/ipns/
https://ipfs.io/ipns/QmbX1mn42J9Fh7ascyaX2txtqRxRNFg3NWMXFr8k6HqKBj
5. Bind IPNS to domain by adding a DNS TXT record of the form
Yes, it works for me after 1 hour. try and fail. Let me summarize the working sample. working sample: local gateway http://127.0.0.1:8080/ipfs/QmcXbRoSrnmqwVFms3t9iX6DZMtKfUB9PJj6j8HQp59Ubj http://127.0.0.1:8080/ipns/QmbX1mn42J9Fh7ascyaX2txtqRxRNFg3NWMXFr8k6HqKBj publick gateway https://ipfs.io/ipfs/QmcXbRoSrnmqwVFms3t9iX6DZMtKfUB9PJj6j8HQp59Ubj https://ipfs.io/ipns/QmbX1mn42J9Fh7ascyaX2txtqRxRNFg3NWMXFr8k6HqKBj Now I bind domain 'pdfbay.org' DNS txt record @ means current domain pdfbay.org TXT: type 1m: 1 second ( default is 1 hour, but I set it as 1m for quick) @ | TXT | 1m | "dnslink=/ipns/QmbX1mn42J9Fh7ascyaX2txtqRxRNFg3NWMXFr8k6HqKBj"
To verify on terminal, I try ipfs name resolve, it works fine, D:\>ipfs name resolve -r pdfbay.org /ipfs/QmcXbRoSrnmqwVFms3t9iX6DZMtKfUB9PJj6j8HQp59Ubj To verify on DNS txt lookup tool, you can verify you DNS TXT record is correctly configured. https://mxtoolbox.com/SuperTool.aspx put your domain, pdfbay.org, then choose TXT lookup. you should see 1 record below: TXT | pdfbay.org | 60 sec | dnslink=/ipns/QmbX1mn42J9Fh7ascyaX2txtqRxRNFg3NWMXFr8k6HqKBj Even you config correctly , it need some time, may be up to 1 hours to have ipfs bind works, The final working sample is: http://localhost:8080/ipns/pdfbay.org https://ipfs.io/ipns/pdfbay.org
bills-mac-mini:~ Bill$ cd go-ipfs
bills-mac-mini:go-ipfs Bill$ ls
LICENSE README.md build-log install.sh ipfs
bills-mac-mini:go-ipfs Bill$ ./install.sh
We cannot install ./ipfs in one of the directories /usr/local/bin /usr/bin
It seems that we do not have the necessary write permissions.
Perhaps try running this script as a privileged user:
sudo ./install.sh
=======================
reason is you do not have /usr/local/bin folder, you need manually create one, then run again.
or you could just manually copy ipfs.exe to /usr/local/bin.
open install.sh, see, it copy over file with mv.......
cd /
cd usr/local
sudo mkdir bin
another terminal,
bills-mac-mini:~ Bill$ cd go-ipfs
bills-mac-mini:go-ipfs Bill$ ./install.sh
success.
2) install ipfs desktop for mac
unzip,
open, you see ipfs icon show at task bar
But on windows, ipfs icon do not show on task bar, but you can see ipfs process at task manager.
Note that to do this, you likely won’t be able to use the keyboard shortcut. Instead, right-click inside the Terminal window and choose paste. Then, press Control-X to save and close the text editor.
You’ll notice two numbers there: 64000 and 524288. The first is a soft limit, at which point your Mac will start preparing to stop allowing new file opens but still let them go. When the second number is reached, that’s the hard limit – at that point, you’ll get the “Too many files open in system” error.
//linux run with pm2
// by default [path] is ./ [port] is 8080
// so far only 8080 works on centos, server,
// but localhost, any port will work.
pm2 start http-server
Config Server Firewall (CSF) is a Stateful Packet Inspection (SPI) firewall, Login/Intrusion Detection and Security application for Linux servers. It's is a security tool that can protect your server against attacks, such as brute force, and improve server security.
This application will work as a WHM plugin and is free. Follow these instructions to complete a basic CSF installation:
Install CSF: Log into your server as root, using SSH.
If you have changed your SSH port number, you need to add this new port on the "IPv4 Port Settings" and/or "IPv6 Port Settings". You can also use this section to add a specific port for an new application installed on the server.
If you are using R1soft/Idera external backup solution, you need to allow inbound traffic for TCP port 1167 in the port TCP_IN section.
CSF can help you to secure spam abuse vector and detect suspicious email activities.
Set "SMTP_BLOCK" to "1" in "SMTP Settings" section.
Set "LF_SCRIPT_LIMIT" to "250" to identify scripts sending out 250 emails messages in an hour.
Set "LF_SCRIPT_ALERT" to "1" to send an email alert to the system administrator when the limit configured above is reached.
# Save the configuration and confirm the firewall status #
You can save the configuration by clicking the "Change" button at the end of the page. Then restart csf/lfdservice.
Thereafter, go back in the ConfigServer Security Firewall main page. On the top of this page, you should see "Firewall Status: Enabled but in Test Mode" If you see "Firewall Status: Disabled and Stopped" please click on "Enable".
3. Confirm the configuration and remove the "Testing mode".
Once you are satisfied with the configuration and confirmed that it is working fine, you need to remove the "Testing mode". Go back in the "Firewall Configuration ("csf - ConfigServer Firewall" section)
Set "TESTING" to 0
Save this modification by clicking the "Change" button at the end of the page and restart csf/lfd service.
4. Monitor the firewall activity
You can monitor the firewall activity by clicking the "Watch system Logs" button on the ConfigServer Security Firewall main page.
Or read the log file /var/log/lfd.log which is accessible via SSH.
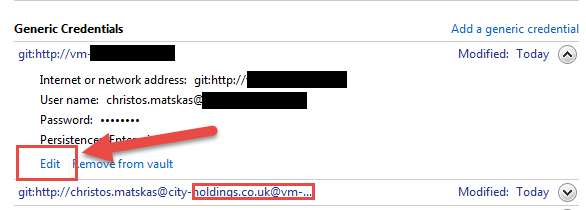
To update your credentials, go to Control Panel -> Credential Manager -> Windows Credentials ->Generic Credentials. Find the credentials related to your git account and edit them to use the updated passwords as per the image below: