apache must use thread safe
download 5.6 x64 thread safe zip
extract zip
1) php.ini need old 5.5
2) folder session_cache need to copy from old 5.5
Done.
Thursday, November 15, 2018
Tuesday, November 6, 2018
How To Transfer Domain From GoDaddy To Google Domains
Namecheap which is certainly one of the closest competitors to GoDaddy, but it will take years of experience for them to match Godaddy standard. If you have been following domain industry news, you must have heard of Google launching their domain service with the name Google domains which are in beta stage & available in U.S.A only.

Today, I got an invitation to try out Google domains, and instead of buying a new domain from them, I thought of transferring and renewing one of my domain hosted on GoDaddy to Google domains.
This guide is for those who are already on Google domains, or you can refer to this once you Google domains goes public. I will show you how to transfer your existing domains on Godaddy to Google domains.
Step by step guide to transfer GoDaddy domain to Google
There are two mandatory steps required to transfer a domain from any domain registrar to new one, and they are:
In this guide, I will show you all the steps you need to do at Godaddy domain managerto unlock and get your domain EPP code to transfer the domain. On the receiving side, I have Google domains, but you can use the same steps for any other domain registrar like NameCheap.
To start with, login to your GoDaddy panel and launch the domain manager at the dashboard:

On the domain manager panel of GoDaddy, you need to click on the domain name which you wish to transfer to Google domains or any other domain registrar.

Now you will be on the domain management page of your selected domain. Here you need to unlock the domain so that your domain can be transferred from one registrar to another. I have already talked about this in details in my earlier guide on how to make your domain secure. Follow the screenshot and simply set the lock status to off:

After unlocking your domain, you need to get your domain authorization code to transfer the domain from one registrar to another. On the same page at the end you will see a column call “Authorization code,” you need to click on “Email code” to get EPP (Authorization code) in your eMail.

Check your Email inbox for your unique domain authorization code, and now it’s time to go to Google domains to transfer the domain name.
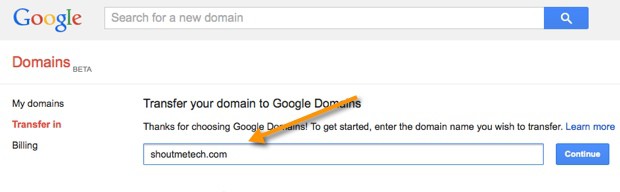
You can login to your Google domains account from here. Once you are inside your Google domains dashboard, you will see an option to “Transfer in” domains.
Click on it and add your domain name which you want to transfer. In this case, add the domain name which you have unlocked on Godaddy and have EPP code for the same.
Click on it and add your domain name which you want to transfer. In this case, add the domain name which you have unlocked on Godaddy and have EPP code for the same.
Click on continue, and it will ask you to follow steps one by one. In our case, we have already unlocked the domain and our who.Is information is updated, so we skip to the step 3 and add the authorisation code.
One important step which you don’t want to skip is step 4.
By default, Google will select the Google’s name server, and you should change it to keep existing name-servers, this will not affect your website in any way, and domain transfer will happen without any downtime.

Click on Import Name servers and in next step Google will ask you to pay $12 (May change) to transfer the domain to Google domains. When you pay for the domain transfer, this will also renew your domain for one more year.
Now you need to add your billing details to confirm the transfer. You will be getting an Email to authenticate the transfer of your domain from your existing domain registrar to Google domains.
Note: Google domains service is currently in beta, and above screenshot might change over the time. However, The procedure will remain the same.
As a blogger, I’m happy to see Google entering into domain business, as it might give a stiff competition to GoDaddy and as a user we get maximum benefit out of it. If you are already using Google domains service, I would like to hear your feedback and comment on the same. If you enjoyed this tutorial, do share it with your friends on Twitter and Facebook.
Thursday, November 1, 2018
统计数字,造假 views time random (100-200)
direct change view count:
SELECT * FROM cleargov1.qa_posts
where postid = 790
edit views value, apply change
==============================================
每一个点击,增加random(100-200)个virew
两个都改成这样
update views in mysql database:
------------------------------------------------
cleargov1: mysql : run sql:
update cleargov1.qa_posts
set views = views * FLOOR(RAND()*(200-100+1)+100)
--------------------------------------------------------------------------
glassgov1: mysql : run sql:
update glassgov1.carbon_topics
set views = views * FLOOR(RAND()*(200-100+1)+100)
====================================================
sql get random number > 100, but < 200
SELECT FLOOR(RAND()*(200-100+1)+100);
==================================================
every view + random (100-200)
for cleargov1:
/qa-include/db/hotness.php
change here:
......................................................................................
ffunction qa_db_increment_views($postid)
{
/* original + 1, now + random(100-200)
$query = 'UPDATE ^posts SET views=views+1, lastviewip=UNHEX($) WHERE postid=# AND (lastviewip IS NULL OR lastviewip!=UNHEX($))';
*/
/* C:\Apache24\htdocs\cleargov1\qa-include\pages\question.php
* add following line to bypass check user,cookie, cache, id, etc..
* $qa_content['inc_views_postid'] = $questionid;
*
* Below sql AND change to OR will bypass check ip
*/
$query = 'UPDATE ^posts SET views=views+FLOOR(RAND()*(200-100+1)+100), lastviewip=UNHEX($) WHERE postid=# OR (lastviewip IS NULL OR lastviewip!=UNHEX($))';
$ipHex = bin2hex(@inet_pton(qa_remote_ip_address()));
qa_db_query_sub($query, $ipHex, $postid, $ipHex);
return qa_db_affected_rows() > 0;
}
............................................................................................................................................
// bypass check user id, user cookie, ip, etc. any click by any one will count to increase page views.
// comment this out, if you want check user
$qa_content['inc_views_postid'] = $questionid;
return $qa_content;
views count above
called here /qa-include/qa-page.php
===================================
glassgov1:
change here:
C:\Apache24\htdocs\glassgov1\controller\topic.php
+ 1 change to + FLOOR(RAND()*(200-100+1)+100)
only change 1 place : other + 1 no need to change
SET Views = Views+1,LastViewedTime
to
SET Views = Views+FLOOR(RAND()*(200-100+1)+100),LastViewedTime
//更新浏览量
if ($MCache) {
$TopicViews = $MCache->get(MemCachePrefix . 'Topic_Views_' . $ID);
//30天内攒满200次点击,Update一次数据库数据
if ($TopicViews && ($TopicViews - $Topic['Views']) >= 200) {
$DB->query("UPDATE " . PREFIX . "topics
FORCE INDEX(PRI)
SET Views = :Views,LastViewedTime = :LastViewedTime Where ID=:ID", array(
'Views' => $TopicViews + 1,
"LastViewedTime" => $TimeStamp,
"ID" => $ID
));
//清理主题缓存
$MCache->delete(MemCachePrefix . 'Topic_' . $ID);
}
$Topic['Views'] = (($TopicViews) ? $TopicViews : $Topic['Views']) + 1;
$MCache->set(MemCachePrefix . 'Topic_Views_' . $ID, $Topic['Views'], 86400 * 30);
} else {
$DB->query("UPDATE " . PREFIX . "topics
FORCE INDEX(PRI)
SET Views = Views+1,LastViewedTime = :LastViewedTime Where ID=:ID", array(
"LastViewedTime" => $TimeStamp,
"ID" => $ID
));
}
==================================================
every view + random (100-200)
for cleargov1:
/qa-include/db/hotness.php
change here:
......................................................................................
ffunction qa_db_increment_views($postid)
{
/* original + 1, now + random(100-200)
$query = 'UPDATE ^posts SET views=views+1, lastviewip=UNHEX($) WHERE postid=# AND (lastviewip IS NULL OR lastviewip!=UNHEX($))';
*/
/* C:\Apache24\htdocs\cleargov1\qa-include\pages\question.php
* add following line to bypass check user,cookie, cache, id, etc..
* $qa_content['inc_views_postid'] = $questionid;
*
* Below sql AND change to OR will bypass check ip
*/
$query = 'UPDATE ^posts SET views=views+FLOOR(RAND()*(200-100+1)+100), lastviewip=UNHEX($) WHERE postid=# OR (lastviewip IS NULL OR lastviewip!=UNHEX($))';
$ipHex = bin2hex(@inet_pton(qa_remote_ip_address()));
qa_db_query_sub($query, $ipHex, $postid, $ipHex);
return qa_db_affected_rows() > 0;
}
............................................................................................................................................
C:\Apache24\htdocs\cleargov1\qa-include\pages\question.php
add one line at bottom:
$qa_content['inc_views_postid'] = $questionid;
// bypass check user id, user cookie, ip, etc. any click by any one will count to increase page views.
// comment this out, if you want check user
$qa_content['inc_views_postid'] = $questionid;
return $qa_content;
views count above
called here /qa-include/qa-page.php
===================================
glassgov1:
change here:
C:\Apache24\htdocs\glassgov1\controller\topic.php
+ 1 change to + FLOOR(RAND()*(200-100+1)+100)
only change 1 place : other + 1 no need to change
SET Views = Views+1,LastViewedTime
to
SET Views = Views+FLOOR(RAND()*(200-100+1)+100),LastViewedTime
//更新浏览量
if ($MCache) {
$TopicViews = $MCache->get(MemCachePrefix . 'Topic_Views_' . $ID);
//30天内攒满200次点击,Update一次数据库数据
if ($TopicViews && ($TopicViews - $Topic['Views']) >= 200) {
$DB->query("UPDATE " . PREFIX . "topics
FORCE INDEX(PRI)
SET Views = :Views,LastViewedTime = :LastViewedTime Where ID=:ID", array(
'Views' => $TopicViews + 1,
"LastViewedTime" => $TimeStamp,
"ID" => $ID
));
//清理主题缓存
$MCache->delete(MemCachePrefix . 'Topic_' . $ID);
}
$Topic['Views'] = (($TopicViews) ? $TopicViews : $Topic['Views']) + 1;
$MCache->set(MemCachePrefix . 'Topic_Views_' . $ID, $Topic['Views'], 86400 * 30);
} else {
$DB->query("UPDATE " . PREFIX . "topics
FORCE INDEX(PRI)
SET Views = Views+1,LastViewedTime = :LastViewedTime Where ID=:ID", array(
"LastViewedTime" => $TimeStamp,
"ID" => $ID
));
}
centos putty node npm pm2
pm2 startup script
https://pm2.keymetrics.io/docs/usage/startup/
https://futurestud.io/tutorials/pm2-restart-processes-after-system-reboot
I think just run
pm2 startuppm2 save is good enough, no need to copy/run pm2 command, because did not tell you to do so. so verytime update pm2 list, need run those 2 steps 2020: update node pm2
node v11.15.0 is the latest version can work on godaddy centOS
latest stable version is v12.x.x will NOT work, error node: /usr/lib64/libstdc++.so.6: version `GLIBCXX_3.4.14' not found (required by node)
because since you cannot install glibc package because of the lack of privileges the workaround would be to install and older version of node Also
v8.16.2, v10.17.0 and v11.15.0 are availablehttps://phoenixnap.com/kb/update-node-js-version
https://stackoverflow.com/questions/57602008/error-while-installing-nodejs-on-godaddy-shared-linux-hosting
Update Node.js with NPM (Node Package Manager)
As
an alternative, you can use Node’s official package manager to update
Node.js. NPM is a tool for installing and managing package dependencies.
If you have Node on your system, you have NPM, as well. With the npm command, you can check running Node.js versions and install the latest release.
By adding the
1. First, clear the npm cache:

2. Install n, Node’s version manager:

3. With the n module installed, you can use it to:
If you have Node on your system, you have NPM, as well. With the npm command, you can check running Node.js versions and install the latest release.
By adding the
n module, you can interactively manage Node.js versions.1. First, clear the npm cache:
npm cache clean -f2. Install n, Node’s version manager:
npm install -g n3. With the n module installed, you can use it to:
- Install the latest stable version:
n stable - Install the latest release:
n latest - Install a specific version:
n [version.number]
======================================
linux
warning:
1) logon putty, cd to directory, detele pm2 0
2) close putty, must do this.Without 2), when you run 4), it still using your deleted old source-code folder.
3) upload source code,extract.
4) logon putty again, cd to directory, run node
run node------:------ must cd into directory,
sudo su - hoogw2000
cd /home/hoogw2000/public_html/arcgis_viewer/
Must rename .env to windows.env and centos.env to .env
pm2 start npm -- start
kill node:
http://pm2.keymetrics.io
pm2 delete 0
pm2 stop 0
pm2 list
windows start node js
nodemon --exec npm start
// // nohup nodemon --exec npm start
// // nohup nodemon --exec npm start
************* user (hoogw) cd /../.../ permission denied ***********************
putty login (only as hoogw, it is server account) NOT hoogw2000, it is cpannel account,use to login to cpannel
whoami [show currently what user]
ls, permission denied, try sudo ls
switch user to hoogw2000:
sudo su - hoogw2000
if get permission denied, try run as root(super user mode):
sudo su
cd /.../......
if run as hoogw2000, you should be able to :
cd /home/hoogw2000/public_html/arcgis_viewer/
pm2 start npm -- start
========================================================
Install nodejs, npm, pm2 globally
Step 1 – Add Node.js Yum Repository
First of all, You need to enable node.js yum repository in your system provided by the Node.js official website. You also need development tools to build native add-ons to be installed on your system.
For Latest Release:-
yum install -y gcc-c++ make
curl -sL https://rpm.nodesource.com/setup_11.x | sudo -E bash -
For Stable Release:-
yum install -y gcc-c++ make
curl -sL https://rpm.nodesource.com/setup_8.x | sudo -E bash -
Step 2 – Install Node.js and NPM
After adding yum repository in your system lets install Node.js package. NPM will also be installed with node.js. This command will also install many other dependent packages on your system.
yum install nodejs
Don’t Miss => Yarn Installation ( A Node Modules Manager)
Install Yarn using NPM
Yarn package is available to install with NPM. You can simply run the following command to install Yarn globally. Also, remove -g option to install for current project only.
sudo npm install yarn -g
Step 3 – Check Node.js and NPM Version
After installing node.js verify and check the installed version. You can find more details about current version on node.js official website.
node -v
v11.0.0
Also, check the version of npm.
npm -v
6.4.1
--------------------------
Install PM2 globally:
1)run as root(super user mode):
sudo su
2) npm i -g pm2
or if user is sudo-er
sudo npm i -g pm2
and then go back to user (or stay in root if it was created by root user) and run it:
pm2 start server.js
******* End ****** user (hoogw) cd /../.../ permission denied ***********************
Subscribe to:
Posts (Atom)