Friday, February 24, 2017

opencart SSL

SSL stands for Secure Sockets Layer and is a standard security technology used to encrypt the connection between the browser and the hosting server on which your website is hosted. A website having an SSL certificate is most commonly recognized by the https URL and the secured padlock in the client browser.

Having an SSL certificate for your website will improve your visitors' trust and confidence that their personal and credit card information is secure and will help you improve your store conversion rate.

HTTP vs HTTPS

Installing your OpenCart 2 application for the https:// protocol, without having a valid SSL certificate, might affect your website accessibility or result in security warnings. If you need a hosting solution with SSL certificate to secure your store, you may review our OpenCart 2 Hosting plans.

STEP 1Set your HTTPS URL in OpenCart 2 config.php Files

Before you enable the SSL support in your OpenCart 2 admin dashboard you will need to edit the two configuration files of your OpenCart 2. Both files are called config.php and they are located under the root directory of your OpenCart 2 application and under the admin folder:

[opencart-root-folder]/config.php
[opencart-root-folder]/admin/config.php

You can edit your files either via your cPanel File Manager or by downloading them on your local computer via FTP and reupload them after the changes.

Either way, you will need to locate the following section in both of your files:

// HTTPS
define('HTTPS_SERVER', 'http://yourdomain.com/');

Modify the line to include https instead of http:

// HTTPS
define('HTTPS_SERVER', 'https://yourdomain.com/');

When you have the correct https URL set  for your OpenCart 2 application, save the files and upload them back to your OpenCart 2 installation if you are performing the changes locally on your computer.  Remember to modify both the main config.php file and the admin folder config.php.

STEP 2Enable SSL via the OpenCart 2 Admin

Now you need to activate the SSL support via the OpenCart 2 admin dashboard. You can easily do this by logging in your OpenCart 2 admin panel and refer to the settings menu.

OpenCart 2 Admin Settings

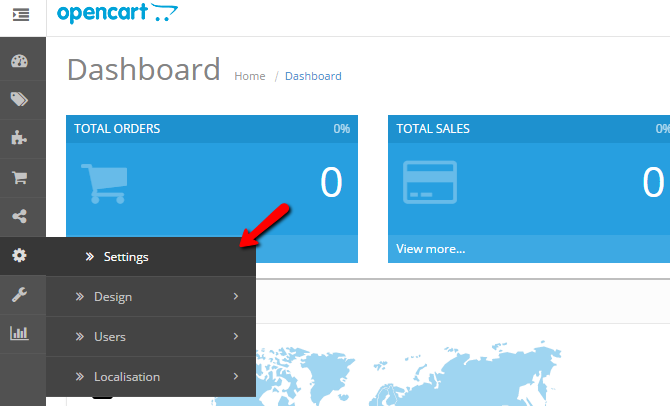
From the store list click on the edit icon next to your store name and proceed to the Server settings tab.

Enable SSL OpenCart 2

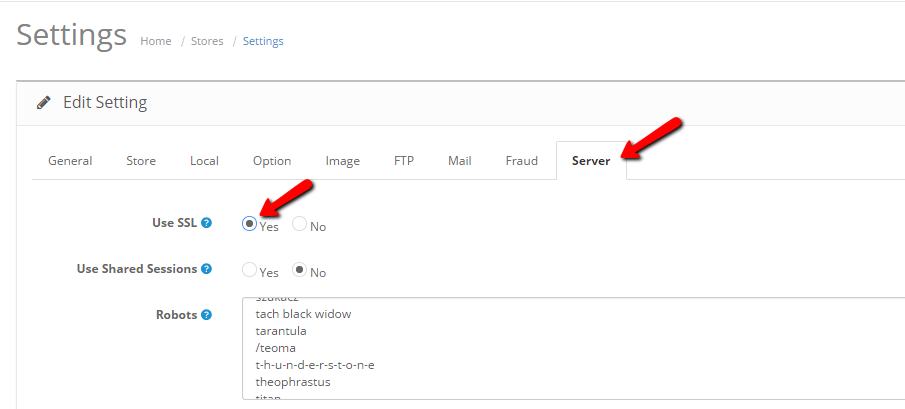
The first settings under the Server tab should be the Use SSL option. Click on the Yes radio button and save your settings via the save icon at the top right corner of your screen.

Now your checkout, registration and other pages on which sensitive information is submitted will be accessible only via HTTPS.

STEP 3Force HTTPS only for your OpenCart 2

If you would like to have your store accessible via HTTPS only, you may return to Step 1 in this tutorial and edit not only the HTTPS URL but the HTTP as well.

To do this, open once again your OpenCart 2 config files and edit the following line:

// HTTP
define('HTTP_SERVER', 'http://yourdomain.com/');

to

// HTTP
define('HTTP_SERVER', 'https://yourdomain.com/');

This way you will force your store to use HTTPS only for all pages and your admin panel. 

Wednesday, February 22, 2017

mysql backup

mysql workbench,


1)  Not on top menu, but on left side bar, click data export,


2) each time, choose only one database,


3) choose export to self-contained file, put file name there


To import,

1)  Not on top menu, but on left side bar, click data import/restore

2)  Choose import from self-contained file,

3) default target schema, choose your database name, if not exist, you can click new button to create one.


Friday, February 10, 2017

opencart

/opencart/   2.2.0.0
/opencart2/ 2.3.1.0 github

localhost:10/opencart/

normal user:   huguowen@gmail.com   aaaa1111
admin:    hoogw    A1a18113


******************************

admin

hoogw
A1a18113


mysql connection:

host:    127.0.0.1
user name: hoogw
A1a18113

*************************************************


------------------------------------------------------

opencart.com  official web site, for extension download

aaaa1111


============================================
SEO search engine enable:

1) apache httpd.conf file, edit -  load mod_rewrite
   
      also,  change any "AllowOverride None" to "AllowOverride All"


2)
htdocs\opencart\.htaccess.txt   rename to \opencart\.htaccess

edit htaccess file.

change "RewriteBase /"  to "RewriteBase /opencart/"  [whatever your project base directory]
======================================================================

auto enable reviews.
add status = '1'


edit: catalog/model/catalog/review.php

find

 public function addReview($product_id, $data) {
      $this->db->query("INSERT INTO " . DB_PREFIX . "review SET author = '" . $this->db->escape($data['name']) . "', customer_id = '" . (int)$this->customer->getId() . "', product_id = '" . (int)$product_id . "', text = '" . $this->db->escape(strip_tags($data['text'])) . "', rating = '" . (int)$data['rating'] . "', date_added = NOW()");
   }

change to

public function addReview($product_id, $data) {
      $this->db->query("INSERT INTO " . DB_PREFIX . "review SET author = '" . $this->db->escape($data['name']) . "', customer_id = '" . (int)$this->customer->getId() . "', product_id = '" . (int)$product_id . "', text = '" . $this->db->escape(strip_tags($data['text'])) . "', rating = '" . (int)$data['rating'] . "', status = '1', date_added = NOW()");
   }


auto enable reviews.

================================================================


+++++++++++++++++++++++++
reset password not working: 


https://forum.opencart.com/viewtopic.php?f=181&t=160272

catalog/controller/account/reset.php
catalog/model/account/customer.php

in customer.php there is called the function 
getCustomerByCode($code)
and then obviously
editPassword($email, $password)

getCustomerByCode($code) says:
"SELECT customer_id, firstname, lastname FROM `" . DB_PREFIX . "customer` WHERE code = '" . $this->db->escape($code) . "' AND code != ''"

That is fine but editPassword($email, $password) needs the email in order to update the password to the new value!

I'll go ahead and alter the script into
"SELECT customer_id, firstname, lastname, email FROM `" . DB_PREFIX . "customer` WHERE code = '" . $this->db->escape($code) . "' AND code != ''"


It works as soon as I also modified catalog/controller/account/reset.php where it says
$this->model_account_customer->editPassword($customer_info['customer_id'], $this->request->post['password']);

That cant work since editPassword needs the customer email. 
Modify into:
$this->model_account_customer->editPassword($customer_info['email'], $this->request->post['password']);

Together with the adaption in catalog/model/account/customer.php it works as intended.
+++++++++++++++++++++++++++++++++++++++++++++++++++++++++++++++++++++


**************************************************************

Move opencart from localhost to server:

1) under root folder, modify config.php,   under admin folder, modify config.php
     change 'localhost' to ' 192.169.199.29'

/// HTTP
//define('HTTP_SERVER', 'http://localhost:10/opencart/');
 define('HTTP_SERVER', 'http://192.169.199.29:10/opencart/');

// HTTPS
//define('HTTPS_SERVER', 'http://localhost:10/opencart/');
define('HTTPS_SERVER', 'http://192.169.199.29:10/opencart/');

2) other backup database, 


Hello! This tutorial will guide you on how to move OpenCart template from localhost to the live server.
  1. First of all, we need to export a database. Navigate to your local phpmyadmin tool. Click on Export button and then on Go.
    OpenCart 2.x. How to move website from localhost to live server_1
    OpenCart 2.x. How to move website from localhost to live server_2
  2. Now navigate to your site root folder and make a zip archive out of its content.
    OpenCart 2.x. How to move website from localhost to live server_3
  3. Let’s upload the archive to the root folder on the live server. Navigate to the cPanel, click on the Upload button, find the needed archive and wait until it is uploaded. Extract the files then.
    OpenCart 2.x. How to move website from localhost to live server_4
    OpenCart 2.x. How to move website from localhost to live server_5
  4. Now we can import our newly exported SQL file to a new database. Navigate to your phpmyadmin tool on the live server.
  5. Click on Import, choose the SQL file and click on Go.
  6. At this point we need to edit two files which are config.php in the root folder and config.php in the admin folder.
    1. In the upper section you need to replace the current path with your new site URL
    2. In the middle section you need to replace the path with the path on your server, you can see it above.
    3. In the bottom section you need to insert your new database details.
    OpenCart 2.x. How to move website from localhost to live server_6
  7. Save changes and navigate to the admin folder to edit config.php file.
  8. Make the same changes to it.
  9. Save changes and check your site now.

This is the end of the tutorial. Feel free to check the detailed video tutorial below:


********************************************************************

Thursday, February 9, 2017

php 7 upgrade

php7 vc15   + apache 2.4.29 vc15

  1. Download PHP, apache, unzip to c:\apache24   and c:\php7\
  2. Add  c:\apache24\bin,   c:\apache24\  and c:\php7\   to PATH environment variable
  3. Update php.ini,   
  4. Update httpd.conf (Apache config file) to load php7apache2_4.dll module in PHP folder and set PHPIniDir to PHP directory
  5. Copy (libeay32.dll) libssh2.dll and (ssleay32.dll) into apache/bin  [I only find libssh2.dll]
  6. Restart Apache.


curl is not loaded by default, so you have to do below manually:
=========================================================

1)Edit php.ini file Enable( uncomment) php_curl.dll and php_openssl.dll extensions


2)go to c:/php7/

Copy libssh2.dll  into c:/apache24/bin folder.

3) test by:  curl_test.php

   
    // Script to test if the CURL extension is installed on this server

     // Define function to test
        function _is_curl_installed() {
    if  (in_array  ('curl', get_loaded_extensions())) {
        return true;
    }
    else {
        return false;
    }
    }

    // Ouput text to user based on test
     if (_is_curl_installed()) {
        echo "cURL is installed on this server";
      } else {
      echo "cURL is NOT installed on this server";
    }
    ?>


====================================================
upgrade is not success, because of mongodb.dll not loaded.


1)

http://windows.php.net/download

apache always use thread safe

VC14 x64 Thread Safe (2017-Jan-18 21:06:35)


2) control panel ---  system ----- advance system --------- environmental variable 

    under system variable, find "path", 
   change c:\php5;  to c:\php7;


3)apache config file,

    edit "httpd.conf"

=======================================
#LoadModule php5_module "c:/php5/php5apache2_4.dll"
#Loadfile "c:/php5/php5ts.dll"

LoadModule php7_module "c:/php7/php7apache2_4.dll"
Loadfile "c:/php7/php7ts.dll"
=============================


  AddType text/html .php
  AddHandler application/x-httpd-php .php


================================
at bottom add:

#PHPIniDir "c:/php5"
PHPIniDir "c:/php7"

=============================================


4). php.ini  updated.

    ;extension_dir = "c:/php5/ext/"
     extension_dir = "c:/php7/ext/"


.................................................
5) mongodb dll update

c:/php7/ext/ folder you need to download 2 mongodb.dll
also, need to add below to php.ini

extension=php_mongodb.dll
;extension=php_mongo.dll ( do not support php7)


go to

https://pecl.php.net/package/mongodb/1.2.5/windows

choose php 7.1, x64 thread safe
php_mongodb-1.2.5-7.1-ts-vc14-x64.zip

download and unzip and copy php_mongodb.dll to c:/php7/ext/ folder


------------------------------------
for php_mongo.dll,  can not find one for php 7.1, so just use
php_mongo-1.6.14-5.6-ts-vc11-x64.zip
[will not load, at php.info()]

https://pecl.php.net/package/mongo/1.6.14/windows

----------------------------------------------


6) C:\php5\session_cache folder must copy or create (huge project use this folder to handle session stuff, so must have it, default php install do not have this folder)

Friday, February 3, 2017

mongodb security

windows 2012 server mongodb security set:

user name: hoogw
password:  aaaa1111

------------------------------------------
Node.js

http://mongodb.github.io/node-mongodb-native/2.0/tutorials/connecting/

var url = 'mongodb://hoogw:aaaa1111@localhost:27017/myproject';

-------------------------------------------------


PHP:


DatabaseFactory.php

$m = new MongoClient("mongodb://$username:$password@localhost", array("db" => $mDB_name));


=============================================================

1) windows firewall

    inbound rules, add new rule --- "mongodb_27017_block"
    which block port 27017


2)   bindip

      open config file, at
       c:\data\config\mongod.cfg

add:

net:
    bindIp: 127.0.0.1
    port: 27017

Note: the property should after 2 space.


3) Add authentication
open config file, at
       c:\data\config\mongod.cfg

add:

security:
 authorization: enabled
yaml do NOT accept tab, you must use space instead of tab

    systemLog:
        destination: file
        path: c:\data\log\mongod.log
    storage:
        dbPath: c:\data\db
    security:
         authorization: enabled
    net:
        bindIp: 127.0.0.1
        port: 27017

above is my mongod.cfg file,
for example between security: and authorization, must be space, tab is invalid will give you the error above on title.

[validate yaml][1]


  [1]: http://codebeautify.org/yaml-validator


4)  follow these steps to enable authorization


+++++++++++++++++++++++   open cmd +++++++++++++++++++++++++++

cd C:\Program Files\MongoDB\Server\3.0\bin

mongo.exe

use admin

db.createUser({ user: "hoogw", pwd: "aaaa1111", roles: [{ role: "userAdminAnyDatabase", db: "admin" }] })

****** verify the admin user has been created ***********
db.auth("hoogw", "aaaa1111")

=================================================

********* add security: authorization to mongod.cfg file *********************

*** re-install  *******
cd C:\Program Files\MongoDB\Server\3.0\bin
mongod.exe --config "C:\data\config\mongod.cfg" --install

******** start mongoDB service ***********
net start MongoDB


-------------------- after enable authrization --------------
use admin
db.auth("hoogw", "aaaa1111")

use civilgis

db.createUser({ user: "civilgis_user", pwd: "aaaa1111", roles: [{ role: "dbOwner", db: "civilgis" }] })


db.auth("civilgis_user", "aaaa1111")


+++++++++++++++++++++++++++++++++++++++++++++++++++++++++++++++++


===========================================

How to Know if You've Been Hacked?

  • Check the MongoDB accounts to see if no one added a secret (admin) user.
  • Check the GridFS to look if someone stored any files there.
  • Check the log files to see who accessed the MongoDB.

How to Protect Yourself?

  • Enable authentication that provides you 'Defense in depth' if your network is compromised. Edit your MongoDB configuration file — auth = true.
  • Use firewalls — Disable remote access to the MongoDB, if possible. Admins are advised to use firewalls to protect the MongoDB installations by blocking access to port no. 27017.
  • Configure Bind_ip — Limit access to the server by binding local IP addresses.
  • Upgrade — Administrators are strongly recommended to upgrade their software to the latest release.