simple mvc framework route issue subpage do not work solution
first you need to enable mod_rewrite feature on apache server, by modify httpd.conf file.
1) directory allowoveride None change to All
2)uncommon load module for mod_rewrite.
A. Make change to .htaccess file simplemvc is the folder I used, so you should replace it with your own folder.
RewriteEngine On
RewriteBase /simplemvc/
B. source code has error,
original: missing "/" before subpage
change to :
Friday, July 31, 2015
panique huge PHP enable mod_rewrite apache windows
Huge use .htaccess file, you MUST make change of apache http.conf file to enable mod_rewrite
apache config folder, edit http.conf file
find and change to AllowOverride All
open the file .http.conf
Find the line #LoadModule rewrite_module modules/mod_rewrite.so and remove the #
================================================
To enable mod_rewrite, I went through the below steps:
- Find and open the file .http.conf. This will be located in your Apache install folder. For me, the full path was C:Program Files (x86)Apache Software FoundationApache2.2conf
- Make a backup of http.conf which you can restore from, if anything were to go wrong
- Find the line #LoadModule rewrite_module modules/mod_rewrite.so and remove the hash ‘#’
- Locate the block within the directory tags as indicated below and change to:
Options All
AllowOverride All


Redirect All Requests To Index.php Using .htaccess
In one of my pet projects, I redirect all requests to index.php, which then decides what to do with it:
Simple Example
This snippet in your .htaccess will ensure that all requests for files and folders that does not exists will be redirected to index.php:
RewriteEngine on
RewriteCond %{REQUEST_FILENAME} !-d
RewriteCond %{REQUEST_FILENAME} !-f
RewriteRule . index.php [L]
This enables the rewrite engine:
RewriteEngine on
This checks for existing folders (-d) and files (-f):
RewriteCond %{REQUEST_FILENAME} !-d
RewriteCond %{REQUEST_FILENAME} !-f
And this does the actual redirecting:
RewriteRule . index.php [L]
Extended Example
You can extend this to pass the requested path to the index.php file by modifying the RewriteRule to the following:
RewriteRule ^(.*)$ index.php?q=$1 [L,QSA]
The ^(.*)$ part tells the rewrite module that we want to pass down the whole requested path as one parameter. The QSA part tells the module to append any query strings to the request. The ?q=$1 tells the module how to pass down the parameter. In this case, it's passed down as the q parameter. You can extend this even further by using regular expressions. For example:
RewriteRule ^([^/]*)(.*)$ index.php?first=$1&second=$2
This will pass down the first part of the path as the first parameter, and the rest as the second. So the following request
http://yourhost.com/some/path/somewhere
will result in
http://yourhost.com/index.php?first=some&second=path/somewhere
This allows for some creative ways to do clean URLs.
Trouble Shooting
If it's not working, make sure that mod_rewrite is installed on Apache. On a unix system you can just do
sudo a2enmod rewrite
to achieve that.
========================
Using mod_rewrite to redirect all requests to a page
I always forget how to do this, so I thought I would write it down somewhere.
RewriteEngine on
RewriteCond %{REQUEST_FILENAME} !-f
RewriteRule ^(.*)$ /index.php?request=$1
When in a .htaccess file (provided AllowOverrides is enabled) this will redirect all requests that don't match a physical file to
/index.php, passing the request into the$_GET['request'] variable.
If you miss out the second line: you will get a 500 internal server error as your response because the request to
/index.php would redirect to itself.Monday, July 27, 2015
Steps to add a new custom page in nopCommerce
Step 3) Now, right click the "Controllers" folder > Select "Add" > Select "Controller.."

Step 4) Name the controller: I am naming it by changing the controller name from "Default1Controller" to "MyNewPageController"
In the Scaffolding options, make sure you have selected "Empty controller"

Step 5) Click "Add" and you will see the result in solution explorer as a new controller page called (in my case: "MyNewPageController.cs")

Step 6) In the left side (code): Right click on the Public ActionResult Index( ) line and select "Add View..."

Step 7) Leave the view name as "Index"
The view engine should be Razor (CSHTML)
The only box on this window that should be checked will be "Use a layout or master page:"
(Select the layout / masterpage by clicking the [...] button: I am selecting "_ColumnsTwo.cshtml" in this case)

CLICK ADD BUTTON
Step 8) Now, you will get a "Index.cshtml" page
(In the solution explorer, the location of this page will be in "Views" folder like this: Views > MyNewPage > Index.cshtml)

Step 9) In your solution, open RouteProvider.cs - You will find this file in this location: Nop.Web/Infrastructure/RouteProvider.cs
Step 10) Now, it is time to map the route so that solution can locate the new page. You will see different mapped routes like home page, install , products etc. Similar to that you need to map the route of your new page by adding the code like this:
Step 4) Name the controller: I am naming it by changing the controller name from "Default1Controller" to "MyNewPageController"
In the Scaffolding options, make sure you have selected "Empty controller"
Step 5) Click "Add" and you will see the result in solution explorer as a new controller page called (in my case: "MyNewPageController.cs")
Step 6) In the left side (code): Right click on the Public ActionResult Index( ) line and select "Add View..."
Step 7) Leave the view name as "Index"
The view engine should be Razor (CSHTML)
The only box on this window that should be checked will be "Use a layout or master page:"
(Select the layout / masterpage by clicking the [...] button: I am selecting "_ColumnsTwo.cshtml" in this case)
CLICK ADD BUTTON
Step 8) Now, you will get a "Index.cshtml" page
(In the solution explorer, the location of this page will be in "Views" folder like this: Views > MyNewPage > Index.cshtml)
Step 9) In your solution, open RouteProvider.cs - You will find this file in this location: Nop.Web/Infrastructure/RouteProvider.cs
Step 10) Now, it is time to map the route so that solution can locate the new page. You will see different mapped routes like home page, install , products etc. Similar to that you need to map the route of your new page by adding the code like this:
//My New Page Test routes.MapLocalizedRoute("ThisIsMyNewPage", "MyNewPage", new { controller = "MyNewPage", action = "Index" }, new[] { "Nop.Web.Controllers" });In new { controller = "MyNewPage", action = "Index" }, = "MyNewPage" is the name of your controller
In routes.MapLocalizedRoute("ThisIsMyNewPage", "MyNewPage", = "MyNewPage" is the name of your View folder
Step 11) Now, recompile your solution and press F5
Thursday, July 23, 2015
netbean push to github
netbean push to github
First to create local git repository by 1) - 2)
Second on github create repository and copy http link to clipboard
Third in netbean config to connect to remote http URL you have just created.
1) new project --> choose PHP ---> choose PHP from existing source code

2) Team -> Git -> initialize repository
Team -> Git -> commit write some commit message
3) on github create repository and copy http URL link to clipboard
4)Team -> remote -> push
Fill in the URL and github user name and password
click next -> choose master branch, next then finish.

Wednesday, July 22, 2015
visual studio replace namespace in solution and project
visual studio replace namespace in solution and project
You need to replace 'Nop' with 'whatever'
in text based file( .sln .csproj .cs ),
in file name
in folder name
1) replace 'Nop' with 'eBuild' in all text based file( .sln .csproj .cs )
use Notepad++ , search -> find in file -> specify the directory to root folder of entire solution.
Do not check match whole word only, only check match case, filter should be *.*


RhinoMocks is not install properly. So use Nuget to uninstall it and re-install it will works.
You need to replace 'Nop' with 'whatever'
in text based file( .sln .csproj .cs ),
in file name
in folder name
1) replace 'Nop' with 'eBuild' in all text based file( .sln .csproj .cs )
use Notepad++ , search -> find in file -> specify the directory to root folder of entire solution.
Do not check match whole word only, only check match case, filter should be *.*

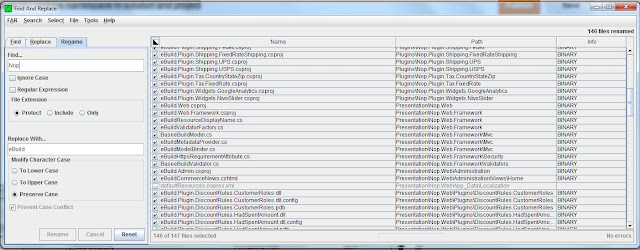
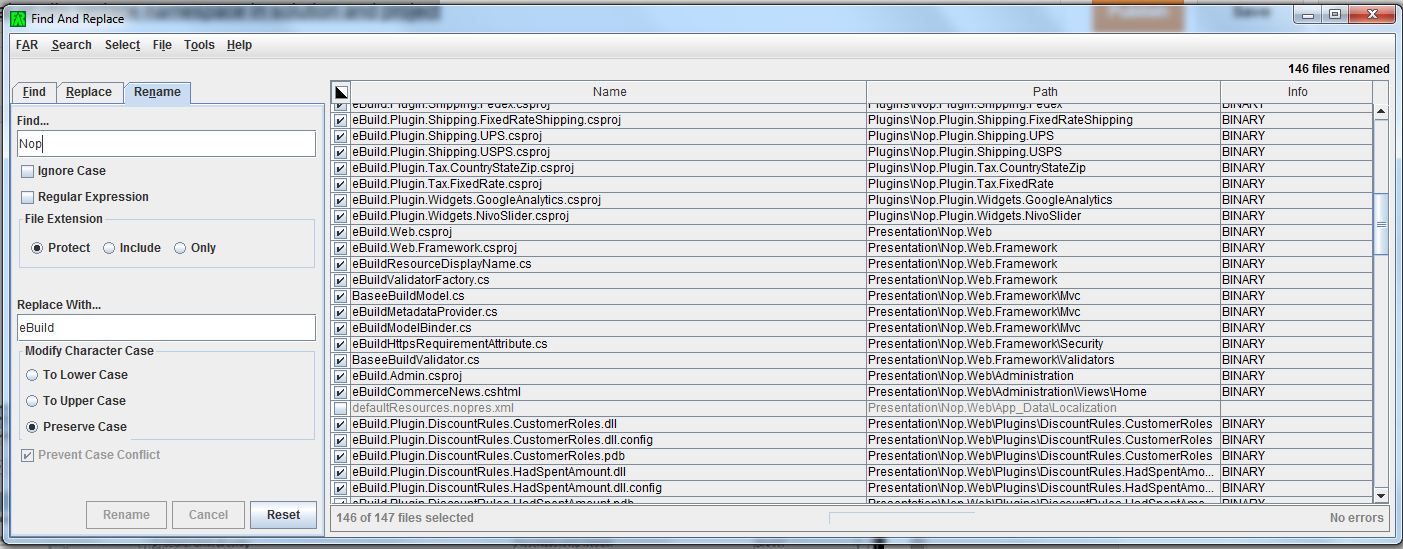
2) replace file name and folder name that has Nop to eBuild
use Far --> Find

--> Rename
3) Replace folder name with win 7 x folder


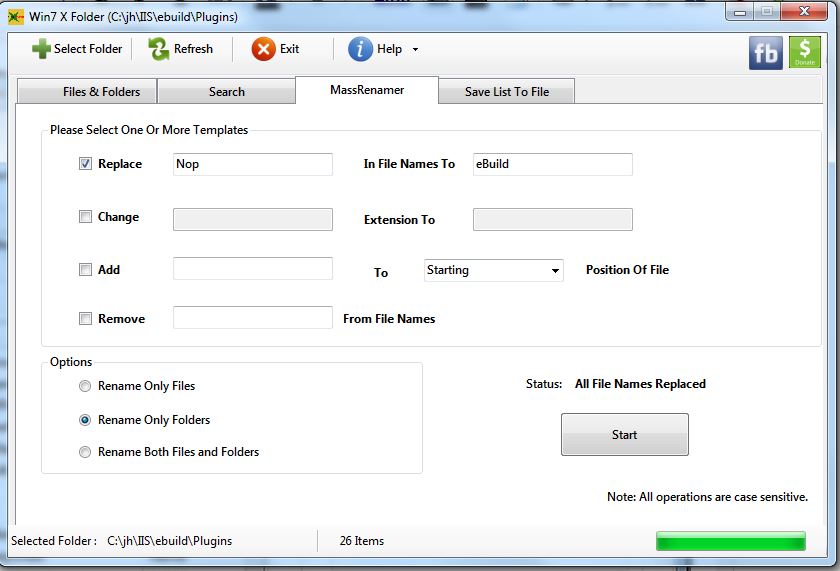
You have to do above multiple 4 times for each for library, plugin, presentation, test folder
Because it does not replace sub-directory, it only rename the current directory.RhinoMocks is not install properly. So use Nuget to uninstall it and re-install it will works.
Thursday, July 2, 2015
point shapefile add lat long field
http://justinberke.blogspot.com/2009/10/calculate-latlong-values-in-arcmap.html
Calculating Lat/Long Coordinates:
Calculating Lat/Long Coordinates:
- Add a point coverage to a project
- Change the data frame to a geographic coordinate system
- Right click on the data frame heading in the table of contents pane and choose Properties
- Navigate to the Coordinate System tab
- Expand the Predefined branch
- Expand the Geographic Coordinate Systems branch
- Expand the North America branch
- Choose North American 1983 HARN and click OK
- Choose Yes if prompted with a coordinate system warning
- Open the layer's Attribute Table and add the following fields /types (LONG_DD is indeed string 3, not a typo)
| Field Name LATITUDE LONGITUDE LAT_DD LAT_MM LAT_SS LONG_DD LONG_MM LONG_SS DATUM | Type/Length Text (string), 20 Text, 20 Text, 2 Text, 2 Text, 9 Text, 3 Text, 2 Text, 9 Text, 25 |
- Go ahead and calculate "North American 1983 HARN" (or whatever coordinate system you used) in the DATUM field. Whomever uses this data in the future will need to the method used to calculate the units
- Now begin to calculate the units. Right click the LATITUDE field and select Calculate Geometry
- Set the Property to "Select Y Coordinate of Point" (Latitude = y, and Longitude = x)
! Note that Latitude = y and Longitude = x. Usually you'll ask for "x/y coordinates" in geometry class, however surveyors ask for "a northing and an easting" - which flips the order of the x and y values around.
- Select "Use coordinate system of the data frame" to use the geographic coordinate system. After this, the Units will change from various length units of measure (meters, feet, etc.) to a number of DMS choices
- Select "Packed DMS Format (+/- DDD.MMSSssssss")" and hit OK
- Repeat this for LONGITUDE with "Select X Coordinate of Point"
- Use the Field Calculator to populate the remaining fields using the following formulas
- LAT_DD: left([LATITUDE], 2)
- LAT_MM: mid([LATITUDE], 4, 2)
- LAT_SS: right([LATITUDE], 8)/1000000
- LONG_DD: left([LONGITUDE], 3)
- LONG_MM: mid([LONGITUDE], 5, 2)
- LONG_SS: right([LONGITUDE], 8)/1000000
- Finally, be sure to Calculate Geometry again on the LATITUDE and LONGITUDE fields (Using the coordinate system of the data frame) but set the units to Decimal Degrees. Until this is finished, the values look like decimal degrees, but if these coordinates are projected, they will be incorrect - perhaps by a long way. A good trick is to see if any values after the decimal are greater than x.599999. If there are any values between x.6 and x.9, those are indeed decimal degrees. There are a few other formats that may be more appropriate for individual projects. Some custom utilities will require lat/long processing fields to match, so be careful with the LAT_DD/LONG_DD fields; thus DMS fields may need to be converted to another data type. Further, field types of Double and Short Integer may be more appropriate for your database.
- Add a field of type double to the attribute table to store either latitude or longitude values.
- Start an edit session.
- Open the attribute table.
- Right-click the field and select Calculate Values.
- Check the 'Advanced' check box.
- Paste the following code into the 'Pre-Logic VBA Code' box:
Dim Output As Double
Dim pPoint As IPoint
Set pPoint = [Shape]
Output = pPoint.X
The above code is for calculating Longitude. X should be changed to Y to calculate Latitude values.
- Type 'Output' into the lower text box.
- Click OK.
Using VBA Script Code in the Field Calculator, a field of type double can be populated with latitude or longitude values.
Wednesday, July 1, 2015
coreldraw remove background
How to remove background using The Cutout Lab in Photo Paint X6
http://howto.corel.com/en/dc/How_to_remove_background_using_The_Cutout_Lab_in_Photo_Paint_X6
The Cutout Lab lets you cut out image areas from the surrounding background. This feature allows you to isolate image areas and preserve edge detail, such as hair or blurred edges.
 1. Open the photo you want to remove the background from.
1. Open the photo you want to remove the background from.
a. Click on File on the Menu bar.
b. Select Open from the drop down list.

c. Locate your photo in the Open an Image window, select it, then click Open button.

2. Click Image on the Menu bar, then select Cutout Lab from the drop down list.

3. Click the Highlighter tool, or press F5 on your keyboard.
a. You can customize the thickness of the Highlighter tool by adjusting the nib size in the tool options.
If an image area has hard edges, you can use a thinner line to define its edges more precisely. Conversely, if an image area has blurred or wispy edges that are hard to define, you can use a thicker line.
b. You can change the highlight color and the fill color to make them more visible.

4. In the preview window, draw a line along the edges of the image area that you want to cut out.

Note: If you make a mistake while drawing a line along the edges of the image, you may use the following options to fix what was drawn:
a. Use the Eraser tool (X) to erase the drawn line.
b. Or, use the Undo (Ctrl+Z) and Redo (Ctrl+Shift+Z) the sections of the highlighted and filled area.
5. Click the Inside fill tool (F), and click inside the area you want to cut out.
5. Click the Inside fill tool (F), and click inside the area you want to cut out.

6. Now click on the Preview button.

To evaluate the results, you can preview the cutout with the background removed or against a background of gray, white, or black.

You also have the options to touch up the cutout.
a. Use the Add detail tool (A) to bring back the deleted parts along the edges of the image.
b. Use the Remove detail tool (R) to delete unwanted detail along the edges of the image.
7. From the Cutout results area, choose any of the following options:
- Cutout creates an object from the cutout and discards the original image
- Cutout and original image creates an object from the cutout and preserves the original image
- Cutout as clip mask creates a clip mask from the cutout and attaches the clip mask to the original image. If a cutout is created from a background image, the background is converted to an object.

8. Click Ok.
arcgis cut polygon with another polygon
- Start an edit session from the Editor toolbar.
- Using the edit tool, select the overlaying polygon.
- Click the Editor dropdown and select 'Clip'.
- Leave the 'buffer distance' set to 0.00.
- Under 'When Clipping Features', select 'Discard the area that intersects' and then click OK.
- Delete or move the overlaying polygon. The underlying polygon has the overlaying polygon area clipped from the feature
http://support.esri.com/en/knowledgebase/techarticles/detail/30403
Subscribe to:
Posts (Atom)