current:
Note: No space No special char, on column name, must remove any space on column name from the begin in Excel.
Otherwise datatables filter search will fail.
1) download excel, csv and open it.
2) remove any column that DO NOT Need, the less column, the faster query speed.
3)No space No special char,on column name, must remove any space on column name from the begin in Excel.
4)import excel into sql server.
5)Mysql work bench migration wizard to transfer from sql server to mysql.
top menu > database >Migration wizard
setting: use schema as is.
choose: only one schema:...
if existing, keep ......
Now sql server to mysql finished.
Next is export mysql to a file, transfer file to server and import file back to mysql(server)
6)
source : mysql work bench, top menu > server > data export.
export to self-contained (single) file format (xxx.sql)
or :
export to dump project, each table will be separate file for selective restore.
target : mysql work bench, top menu > server > data import.
import from single file format (xxx.sql), create a new schema before import
++++++++++++++++++++++++++++++++++++++++++++++++++++++++++++
old
==========================================================
import csv to mysql tips:
0)must use excel to open csv file, find any comma , replace comma with space
because any extra comma will fail the import later.
replace any (,) (") with space, because it will fail import
1)column title must be NO space, No special character, No "-",
2)Notpad++ open csv, menu > encode > convert to utf-8
3)mysql workbench, import table,
change all field to Text type, because int, double type can fail the whole import
import to sql server, use excel format.
--------------------------------------------------------------
-------------------------------------------------
download and install
mysql for excel
http://dev.mysql.com/doc/mysql-for-excel/en/mysql-for-excel-install.html
open csv file in excel, click "Data" tab on top rainbow, find and click mysql for excel button
select all data, click export to mysql.
Note to set a ID column as primary key.
2) add primary key to column, you should change the column name to "Id"
3).specify column option , click each header and edit the column name and data type below it.
such as currency type should be decimal(19,4) for large amount decimal(10,2) for regular use.
as well as other varchar(255).
or you can alter table after.
when finished, go to mysql workbench to alter the table,
such as currency type should be decimal(19,4) for large amount decimal(10,2) for regular use.
as well as other varchar(255).
Wednesday, September 30, 2015
Monday, September 28, 2015
infinity table infinity scroll
adazzle
http://adazzle.github.io/react-data-grid/index.html#
http://adazzle.github.io/react-data-grid/index.html#
Fixed Data Tables
http://facebook.github.io/fixed-data-table/
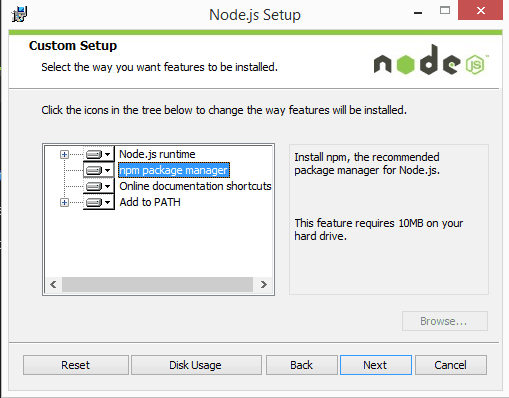
install npm bower node.js on windows
install npm bower node.js on windows
1) install Node.js first. and git for windows
Download the Windows installer from the Nodes.js® web site.
2) install bower, open node.js command prompt
C:\Users\hu_j>npm install -g bower
3) Now you can go to your project web folder to use bower install special package
for example:
C:\Users\hu_j>cd C:\jh\IIS\CivilGis\CivilGis
C:\jh\IIS\CivilGis\CivilGis>bower install angular-smart-table
NOTE:
a)
control panel > system> advance setting
add user path
----------------------------------------------------
b) must install git for windows, because bower need some package for git to get it.

1) install Node.js first. and git for windows
Download the Windows installer from the Nodes.js® web site.
2) install bower, open node.js command prompt
C:\Users\hu_j>npm install -g bower
3) Now you can go to your project web folder to use bower install special package
for example:
C:\Users\hu_j>cd C:\jh\IIS\CivilGis\CivilGis
C:\jh\IIS\CivilGis\CivilGis>bower install angular-smart-table
NOTE:
a)
control panel > system> advance setting
add user path
;C:\Program Files\nodejs\----------------------------------------------------
b) must install git for windows, because bower need some package for git to get it.
Windows users
To use Bower on Windows, you must install msysgit correctly. Be sure to check the option shown below:

Note that if you use TortoiseGit and if Bower keeps asking for your SSH password, you should add the following environment variable:
GIT_SSH - C:\Program Files\TortoiseGit\bin\TortoisePlink.exe. Adjust the TortoisePlink path if needed.Installation Steps
- Download the Windows installer from the Nodes.js® web site.
- Run the installer (the .msi file you downloaded in the previous step.)
- Follow the prompts in the installer (Accept the license agreement, click the NEXT button a bunch of times and accept the default installation settings).

- Restart your computer. You won’t be able to run Node.js® until you restart your computer.
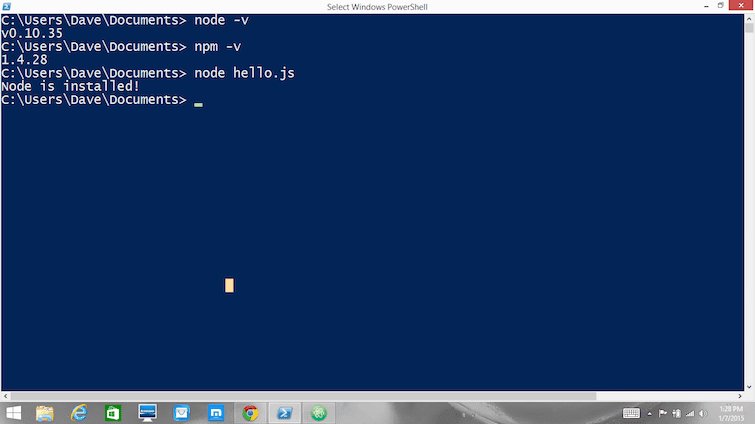
Test it!
Make sure you have Node and NPM installed by running simple commands to see what version of each is installed and to run a simple test program:
- Test Node. To see if Node is installed, open the Windows Command Prompt, Powershell or a similar command line tool, and type
node -v. This should print a version number, so you’ll see something like this v0.10.35.
- Test NPM. To see if NPM is installed, type
npm -v in Terminal. This should print NPM’s version number so you’ll see something like this 1.4.28
- Create a test file and run it. A simple way to test that node.js works is to create a JavaScript file: name it
hello.js, and just add the code console.log('Node is installed!');. To run the code simply open your command line program, navigate to the folder where you save the file and type node hello.js. This will start Node and run the code in the hello.js file. You should see the output Node is installed!.
node -v. This should print a version number, so you’ll see something like this v0.10.35.npm -v in Terminal. This should print NPM’s version number so you’ll see something like this 1.4.28hello.js, and just add the code console.log('Node is installed!');. To run the code simply open your command line program, navigate to the folder where you save the file and type node hello.js. This will start Node and run the code in the hello.js file. You should see the output Node is installed!.
 How to Update Node and NPM
New versions of Node and NPM come out frequently. To install the updates, justdownload the installer from the Nodejs.org site and run it again. The new version of Node and NPM will replace the older versions.
How to Uninstall Node and NPM
You uninstall Node.js and NPM the same as you would most Windows software:
- Open the Windows Control Panel
- Choose the “Programs and Features” option
- Click the “Uninstall a program” option
- Select Node.js, and click the Uninstall link.
Thursday, September 24, 2015
sql search all columns for value
http://lalitkumarb.com/2015/01/06/sql-to-search-for-a-value-in-all-columns-of-all-atbles-in-an-entire-schema/
http://blogs.thesitedoctor.co.uk/tim/2010/02/19/Search+Every+Table+And+Field+In+A+SQL+Server+Database+Updated.aspx
---
DECLARE @SearchStr nvarchar(100)
SET @SearchStr = '## YOUR STRING HERE ##'
-- Copyright © 2002 Narayana Vyas Kondreddi. All rights reserved.
-- Purpose: To search all columns of all tables for a given search string
-- Written by: Narayana Vyas Kondreddi
-- Site: http://vyaskn.tripod.com
-- Updated and tested by Tim Gaunt
-- http://www.thesitedoctor.co.uk
-- http://blogs.thesitedoctor.co.uk/tim/2010/02/19/Search+Every+Table+And+Field+In+A+SQL+Server+Database+Updated.aspx
-- Tested on: SQL Server 7.0, SQL Server 2000, SQL Server 2005 and SQL Server 2010
-- Date modified: 03rd March 2011 19:00 GMT
CREATE TABLE #Results (ColumnName nvarchar(370), ColumnValue nvarchar(3630))
SET NOCOUNT ON
DECLARE @TableName nvarchar(256), @ColumnName nvarchar(128), @SearchStr2 nvarchar(110)
SET @TableName = ''
SET @SearchStr2 = QUOTENAME('%' + @SearchStr + '%','''')
WHILE @TableName IS NOT NULL
BEGIN
SET @ColumnName = ''
SET @TableName =
(
SELECT MIN(QUOTENAME(TABLE_SCHEMA) + '.' + QUOTENAME(TABLE_NAME))
FROM INFORMATION_SCHEMA.TABLES
WHERE TABLE_TYPE = 'BASE TABLE'
AND QUOTENAME(TABLE_SCHEMA) + '.' + QUOTENAME(TABLE_NAME) > @TableName
AND OBJECTPROPERTY(
OBJECT_ID(
QUOTENAME(TABLE_SCHEMA) + '.' + QUOTENAME(TABLE_NAME)
), 'IsMSShipped'
) = 0
)
WHILE (@TableName IS NOT NULL) AND (@ColumnName IS NOT NULL)
BEGIN
SET @ColumnName =
(
SELECT MIN(QUOTENAME(COLUMN_NAME))
FROM INFORMATION_SCHEMA.COLUMNS
WHERE TABLE_SCHEMA = PARSENAME(@TableName, 2)
AND TABLE_NAME = PARSENAME(@TableName, 1)
AND DATA_TYPE IN ('char', 'varchar', 'nchar', 'nvarchar', 'int', 'decimal')
AND QUOTENAME(COLUMN_NAME) > @ColumnName
)
IF @ColumnName IS NOT NULL
BEGIN
INSERT INTO #Results
EXEC
(
'SELECT ''' + @TableName + '.' + @ColumnName + ''', LEFT(' + @ColumnName + ', 3630) FROM ' + @TableName + ' (NOLOCK) ' +
' WHERE ' + @ColumnName + ' LIKE ' + @SearchStr2
)
END
END
END
SELECT ColumnName, ColumnValue FROM #Results
DROP TABLE #Results
One of the tricky questions asked in almost all the Oracle forums “How to search for a VALUE in all COLUMNS of all TABLES in an entire SCHEMA”. One such question is asked in Stack Overflowhttp://stackoverflow.com/questions/208493/search-all-fields-in-all-tables-for-a-specific-value-oracle. The most common answer is using PL/SQL to loop through all the column_name in ALL_TAB_COLUMNS view to check for the given value.
It could be done in a single SQL statement. Let’s look at the SQL solution.
Search for the value KING in SCOTT schema.
SQL> variable val varchar2(10)
SQL> exec :val := 'KING'

PL/SQL procedure successfully completed.

SQL> SELECT DISTINCT SUBSTR (:val, 1, 11) "Searchword",
  2    SUBSTR (table_name, 1, 14) "Table",
  3    SUBSTR (column_name, 1, 14) "Column"
  4  FROM cols,
  5    TABLE (xmlsequence (dbms_xmlgen.getxmltype ('select '
  6    || column_name
  7    || ' from '
  8    || table_name
  9    || ' where upper('
 10    || column_name
 11    || ') like upper(''%'
 12    || :val
 13    || '%'')' ).extract ('ROWSET/ROW/*') ) ) t
 14  ORDER BY "Table"
 15  /

Searchword  Table          Column
----------- -------------- --------------
KING        EMP            ENAME

SQL>
Search for the value 20 in SCOTT schema.
SQL> variable val NUMBER
SQL> exec :val := 20

PL/SQL procedure successfully completed.

SQL> SELECT DISTINCT SUBSTR (:val, 1, 11) "Searchword",
  2    SUBSTR (table_name, 1, 14) "Table",
  3    SUBSTR (column_name, 1, 14) "Column"
  4  FROM cols,
  5    TABLE (xmlsequence (dbms_xmlgen.getxmltype ('select '
  6    || column_name
  7    || ' from '
  8    || table_name
  9    || ' where upper('
 10    || column_name
 11    || ') like upper(''%'
 12    || :val
 13    || '%'')' ).extract ('ROWSET/ROW/*') ) ) t
 14  ORDER BY "Table"
 15  /

Searchword  Table          Column
----------- -------------- --------------
20          DEPT           DEPTNO
20          EMP            DEPTNO
20          EMP            HIREDATE
20          SALGRADE       HISAL
20          SALGRADE       LOSAL

SQL>
http://blogs.thesitedoctor.co.uk/tim/2010/02/19/Search+Every+Table+And+Field+In+A+SQL+Server+Database+Updated.aspx
---
DECLARE @SearchStr nvarchar(100)
SET @SearchStr = '## YOUR STRING HERE ##'
-- Copyright © 2002 Narayana Vyas Kondreddi. All rights reserved.
-- Purpose: To search all columns of all tables for a given search string
-- Written by: Narayana Vyas Kondreddi
-- Site: http://vyaskn.tripod.com
-- Updated and tested by Tim Gaunt
-- http://www.thesitedoctor.co.uk
-- http://blogs.thesitedoctor.co.uk/tim/2010/02/19/Search+Every+Table+And+Field+In+A+SQL+Server+Database+Updated.aspx
-- Tested on: SQL Server 7.0, SQL Server 2000, SQL Server 2005 and SQL Server 2010
-- Date modified: 03rd March 2011 19:00 GMT
CREATE TABLE #Results (ColumnName nvarchar(370), ColumnValue nvarchar(3630))
SET NOCOUNT ON
DECLARE @TableName nvarchar(256), @ColumnName nvarchar(128), @SearchStr2 nvarchar(110)
SET @TableName = ''
SET @SearchStr2 = QUOTENAME('%' + @SearchStr + '%','''')
WHILE @TableName IS NOT NULL
BEGIN
SET @ColumnName = ''
SET @TableName =
(
SELECT MIN(QUOTENAME(TABLE_SCHEMA) + '.' + QUOTENAME(TABLE_NAME))
FROM INFORMATION_SCHEMA.TABLES
WHERE TABLE_TYPE = 'BASE TABLE'
AND QUOTENAME(TABLE_SCHEMA) + '.' + QUOTENAME(TABLE_NAME) > @TableName
AND OBJECTPROPERTY(
OBJECT_ID(
QUOTENAME(TABLE_SCHEMA) + '.' + QUOTENAME(TABLE_NAME)
), 'IsMSShipped'
) = 0
)
WHILE (@TableName IS NOT NULL) AND (@ColumnName IS NOT NULL)
BEGIN
SET @ColumnName =
(
SELECT MIN(QUOTENAME(COLUMN_NAME))
FROM INFORMATION_SCHEMA.COLUMNS
WHERE TABLE_SCHEMA = PARSENAME(@TableName, 2)
AND TABLE_NAME = PARSENAME(@TableName, 1)
AND DATA_TYPE IN ('char', 'varchar', 'nchar', 'nvarchar', 'int', 'decimal')
AND QUOTENAME(COLUMN_NAME) > @ColumnName
)
IF @ColumnName IS NOT NULL
BEGIN
INSERT INTO #Results
EXEC
(
'SELECT ''' + @TableName + '.' + @ColumnName + ''', LEFT(' + @ColumnName + ', 3630) FROM ' + @TableName + ' (NOLOCK) ' +
' WHERE ' + @ColumnName + ' LIKE ' + @SearchStr2
)
END
END
END
SELECT ColumnName, ColumnValue FROM #Results
DROP TABLE #Results
Thursday, September 10, 2015
Install MongoDB PHP driver on Windows server 2012
1) C:\php5\session_cache folder must copy or create (huge project use this folder to handle session stuff, so must have it, default php install do not have this folder)
2)
NOTE: must add c:\php5\ path to environment variable at system path (environment variable)
Otherwise php.info will not load mongo.dll
at php.ini add follow line:
extension=php_mongo.dll
; must use php_mongo-1.6.8-5.5-vc11-x86_64 rename to php_mongo.dll 5.5 means current php 5.5 version. vc11 64
; NOTE: must add c:\php5\ path to environment variable at system path (environment variable)
to download php_mongo.dll go to
https://pecl.php.net/package/mongo
3)
php_mongodb.dll is NOT same as php_mongo.dll
mongodb.dll is newest libary. go to download dll, unzip, apache always use thread safe.
php_mongodb-1.2.5-5.5-ts-vc11-x64.
copy the dll to c:/php5/ext/
https://pecl.php.net/package/mongodb/1.2.5/windows
at php.ini add follow line:
extension=php_mongodb.dll
for mongodb.dll https://pecl.php.net/package/mongodb,
click DLL, download thread safe x64 version
for mongo.dll https://pecl.php.net/package/mongo
4)
use composer to install the lib
http://php.net/manual/en/mongodb.tutorial.library.php
http://php.net/manual/en/set.mongodb.php
C:\Users\HU_J>cd C:\Apache24\htdocs\civilpdf
C:\Apache24\htdocs\civilpdf>composer self-update
C:\Apache24\htdocs\civilpdf>composer require mongodb/mongodb
You are ready to use mongodb php lib
//######## sample for old and new mongo.dll mongodb.dll api ########################################
//---------old mongo.dll -------
// $m = new MongoClient();
// $db = $m->civilpdf;
// $collection = $db->pdf;
// $insert_One_PDF = $collection->insert([ ]};
//-------------------------------
//-----------------------+++++++++++++++ new mongodb.dll ++++++++++++++++++-------------------
// .....version 1
// $mongo = new MongoDB\Driver\Manager("mongodb://localhost:27017");
//
// $bulk = new MongoDB\Driver\BulkWrite;
// $bulk->insert([
// 'user_id' => $user_id,
// 'user_name' => $user_name,
//
// 'file_id' => $file_id,
// 'publicurl' => $publicurl,
// 'title' => $title,
// 'description' => $description,
// 'organization' => $organization,
// 'publish_year' => $publish_year,
// 'publish_month' => $publish_month,
// 'tag' => $tag,
// 'submit_time' => $submit_time,
//
//
//
// ]);
// $mongo-> executeBulkWrite("civilpdf.pdf", $bulk);
//............................
//..... version 2
// $client = new MongoDB\Client("mongodb://localhost:27017");
// $collection = $client->civilpdf->pdf;
//
//
// $insert_One_PDF = $collection->insertOne([
// 'user_id' => $user_id,
// 'user_name' => $user_name,
//
// 'file_id' => $file_id,
// 'publicurl' => $publicurl,
// 'title' => $title,
// 'description' => $description,
// 'organization' => $organization,
// 'publish_year' => $publish_year,
// 'publish_month' => $publish_month,
// 'tag' => $tag,
// 'submit_time' => $submit_time,
//
//
// ]);
//----------------------------------++++++++++++++++++++---------------------------------------------------
//############################ END ################### sample for old and new mongo.dll mongodb.dll api ########################################
=========================================================
Wednesday, September 9, 2015
tomcat install
install tomcat 32-bit/64-bit Windows Service Installer exe.
use tomcat monitor to start server.
then http://localhost:8080/
To be able to use Manager App and server status,
you have to add below user to
C:\tomcat8\conf\tomcat-users.xml file.

http://stackoverflow.com/questions/3829513/what-is-the-default-username-and-password-in-tomcat
use tomcat monitor to start server.
then http://localhost:8080/
To be able to use Manager App and server status,
you have to add below user to
C:\tomcat8\conf\tomcat-users.xml file.

http://stackoverflow.com/questions/3829513/what-is-the-default-username-and-password-in-tomcat
xml version="1.0" encoding="UTF-8"?>
<tomcat-users>
  <role rolename="manager-gui"/>
  <role rolename="manager-script"/>
  <role rolename="manager-jmx"/>
  <role rolename="manager-status"/>
  <role rolename="admin-gui"/>
  <role rolename="admin-script"/>
  <user username="admin" password="admin" roles="manager-gui,manager-script,manager-jmx,manager-status,admin-gui,admin-script"/>
</tomcat-users>
NOTE that there shouldn't be ANY spaces between roles for admin, as this list should be comma separated.
So, instead of this (as suggested in some answers:
<user username="admin" password="admin" roles="manager-gui, manager-script, manager-jmx, manager-status, admin-gui, admin-script"/>
it MUST be like this:
<user username="admin" password="admin" roles="manager-gui,manager-script,manager-jmx,manainstall apache php windows server 2012
rebuild php apache, node
1) Install mysql, 5.7, it auto install vc++ 2013 vc++2015, so no need manual install for apache later.
As long as mysql, bench installed , you are good with vc++
1) unzip folder 'apache24' and 'php5' to c:\
2) install apache as service by: use command line, cd into apache24\bin\
httpd.exe -k install
3)add to path envrionment variable.
Add
;c:\php5;c:\Apache24; c:\Apache24\bin;
4) run apache24\bin\apache monitor.exe
5) install node, (npm included.)
6)firewall open port 80, 3000
7)copy node folder arcgis_viewer
8) cmd install nodemon
npm install -g nodemon
9)import mysql database.
nodemon --exec npm start
==============================================================
php7 vc15 + apache 2.4.29 vc15
- Download PHP, apache, unzip to c:\apache24 and c:\php7\
- Add c:\apache24\bin, c:\apache24\ and c:\php7\ to PATH environment variable
- Update php.ini,
- Update httpd.conf (Apache config file) to load php7apache2_4.dll module in PHP folder and set PHPIniDir to PHP directory
- Copy (libeay32.dll) libssh2.dll and (ssleay32.dll) into apache/bin [I only find libssh2.dll]
- Restart Apache.
curl is not loaded by default, so you have to do below manually:
=========================================================
1)Edit php.ini file Enable( uncomment) php_curl.dll and php_openssl.dll extensions
2)go to c:/php7/
Copy libssh2.dll into c:/apache24/bin folder.
3) test by: curl_test.php
// Script to test if the CURL extension is installed on this server
// Define function to test
function _is_curl_installed() {
if (in_array ('curl', get_loaded_extensions())) {
return true;
}
else {
return false;
}
}
// Ouput text to user based on test
if (_is_curl_installed()) {
echo "cURL is installed on this server";
} else {
echo "cURL is NOT installed on this server";
}
?>
=================================================================
must have visual c++ installed (visual studio)1) unzip folder 'apache24' and 'php5' to c:\
2) install apache as service by: use command line, cd into apache24\bin\
httpd.exe -k install
3)add to path envrionment variable.
Add
;c:\php5;c:\Apache24; c:\Apache24\bin;
4) run apache24\bin\apache monitor.exe
======================================================================================
Well it is finally time to start playing a bit more with Microsoft’s latestserver OS
 Windows Server 2012 R2. One of the many things to have on the list is getting the WAMP (Windows/Apache/MySQL/PHP) stack working. So in this post we will get installed and running Apache 2.4.9, MySQL 5.6.19 and PHP 5.5.13 on Windows Server 2012 R2. Also, instead of 32 bit apps we will be install 64 bit.
You will need to download and install Visual C++ Re-distributable for Visual Studio 2012 fromhttp://www.microsoft.com/en-us/download/details.aspx?id=30679#. You will also need .NET 4.0 installed as a prereq for MySQL and Visual C++ 2010 re-distributablehttp://www.microsoft.com/en-us/download/details.aspx?id=14632.
++ Re-distributable for Visual Studio 2012 fromhttp://www.microsoft.com/en-us/download/details.aspx?id=30679#. You will also need .NET 4.0 installed as a prereq for MySQL and Visual C++ 2010 re-distributablehttp://www.microsoft.com/en-us/download/details.aspx?id=14632.
Download 64 bit Apache (httpd-2.4.9-win64-VC11.zip) from http://www.apachelounge.com/download/. Download and extract the zip and copy it to the root of C:\. This will be C:\Apache24 when it is all done.
(httpd-2.4.9-win64-VC11.zip) from http://www.apachelounge.com/download/. Download and extract the zip and copy it to the root of C:\. This will be C:\Apache24 when it is all done.
Download php-5.5.13-Win32-VC11-x64.zip Thread Safe from http://windows.php.net/download/ . Extract and rename folder to php and move to C:\.
and move to C:\.
Extract php-5.5.13-Win32-VC11-x64.zip. Edit Apache’s config file, c:\Apache24\conf\httpd.conf and add the following lines to the bottom of the file.
LoadModule php5_module "c:/php/php5apache2_4.dll"
AddHandler application/x-httpd-php .php
# configure the path to php.ini
PHPIniDir "C:/php"
While we are at it we can add index.php to Apache’s list just incase we want to have a starting page as php.
Find Directory index and add index.php
DirectoryIndex index.html index.php
Next we need to input a value for ServerName variable. You will have to un-comment it. Save the changes to the config file. Next move to the Register Apache Service step.
Apache Service step.
Register Apache Service
Now let’s register Apache as a service. Open a command prompt and type.
and type.c:\apache24\bin\httpd -k install
If do not want Apache starting automatically at start-up/reboot:
GUI Way
- START | RUN
- Type in services.msc, hit Enter or click OK
- Locate Apache2 service and double-click (or right-click for Properties)
- Find the caption Startup type: (in the middle of the dialog box), use the pull-down and select Manual
- Click OK
Command line
C:\> sc config Apache2.4 start= demand
Add
;c:\php;c:\Apache24; c:\Apache24\bin;
to PATH in Environment variables. PATH ENVIRONMENT (System Properties | Advanced | Environment Variables | System variables | Path).
Example:
;c:\php;c:\apache24;c:\apache24\bin;
| Environment Variables | System variables | Path).Example:
;c:\php;c:\apache24;c:\apache24\bin;
Now lets check Apache settings by issuing the command, c:\Apache24\bin\httpd -S
PHP Edits
Now we have to do a few edits to the php.ini file to tell it to load support for mysql and the location for the extensions. Since there is not a already set php.ini file we need to rename one of the two examples to php.ini.
and the location for the extensions. Since there is not a already set php.ini file we need to rename one of the two examples to php.ini.
Rename c:\php\php.ini-development to php.ini
Now let’s edit php.ini
Uncomment extension directory.
Uncomment extension directory.
; Directory in which the loadable extensions (modules) reside.
; http://php.net/extension-dir
; extension_dir = "./"
; On windows:
extension_dir = "ext"

Uncomment mysql modules
extension=php_mysql.dll
extension=php_mysqli.dll
Save the changes and open a command prompt. Restart Apache to re-read the changes made to PHP.
Check to make sure it shows loaded modules.
C:\> c:\php\php -m
So now we have Apache running and configured to use php. Lets create a file called info.php, save it and see if Apache parses the info correctly to display the results.
Open Notepad or your favorite Windows editor and type and save the following.
Open your browser and type, localhost/info.php for the location and you should receive alot of information about PHP.
MySQL
Download and install mysql-5.6.19-win64.msi. Change installation directory to C:\MySQL\MySQL Server 5.6 instead of Program files as there could be permissions issues. Once the installation is completed you can let the configuration wizard run and setup the database server. The defaults will work just fine, but remember what you set the password to for root.
Download and install mysql-5.6.19-win64.msi. Change installation directory to C:\MySQL\MySQL Server 5.6 instead of Program files as there could be permissions issues. Once the installation is completed you can let the configuration wizard run and setup the database
server. The defaults will work just fine, but remember what you set the password to for root.
PHPMyAdmin
PHPMyAdmin is a very nice tool to use for administering your MySQL installation.
Download and install phpmyadmin-3.4.10.1-english.zip.
Extract the file and move to c:\apache24\htdocs. Rename directory to phpmyadmin.
Create a config directory under phpmyadmin. Open a browser and type localhost/phpmyadmin/setup/index.php to complete the installation.
At this point you should have a working Apache / PHP / MySQL installation running and ready for you to start developing !!!
Subscribe to:
Posts (Atom)