Thursday, January 17, 2019
http-server
https://github.com/indexzero/http-server
linux
putty:
// first switch to root user
sudo su
// install
npm install http-server -g
cd /home/hoogw/fileRestAPI
// windows run
http-server ./fileRestAPI
//linux run with pm2
// by default [path] is ./ [port] is 8080
// so far only 8080 works on centos, server,
// but localhost, any port will work.
pm2 start http-server
centos whm cpanel Firewall CSF
Config Server Firewall (CSF) is a Stateful Packet Inspection (SPI) firewall, Login/Intrusion Detection and Security application for Linux servers.
It's is a security tool that can protect your server against attacks, such as brute force, and improve server security.
It's is a security tool that can protect your server against attacks, such as brute force, and improve server security.
This application will work as a WHM plugin and is free. Follow these instructions to complete a basic CSF installation:
- Install CSF: Log into your server as root, using SSH.
cd /usr/local/src/
wget https://download.configserver.com/csf.tgz
tar -xzf csf.tgz
cd csf
sh install.sh
You will see "Installation Completed".cd .. rm -Rfv csf/ csf.tgz
- Configure CSF: Login to your server via WHM as root and go to the bottom left menu. In the Plugins section, go to ConfigServer Security Firewall.
 Then, in the "csf - ConfigServer Firewall" section (on the right panel), click on "Firewall Configuration".
# Port filtering configuration - IPv4 Port Settings #
The following ports are opened by default:
TCP_IN = "20,21,22,25,53,80,110,143,443,465,587,993,995,2077,2078,2082,2083,2086,2087,2095,2096,26"TCP_OUT = "20,21,22,25,37,43,53,80,110,113,443,587,873,2086,2087,2089,2703"UDP_IN 20,21,53UDP_OUT 20,21,53,113,123,873,6277

If you have changed your SSH port number, you need to add this new port on the "IPv4 Port Settings" and/or "IPv6 Port Settings".
You can also use this section to add a specific port for an new application installed on the server.
You can also use this section to add a specific port for an new application installed on the server.
If you are using R1soft/Idera external backup solution, you need to allow inbound traffic for TCP port 1167 in the port TCP_IN section.
# Enable syslog monitoring #
Set "SYSLOG_CHECK" to "1800"

# Detect suspicious process #
Set "PT_DELETED" to "1"
Set "PT_ALL_USERS" to "1"


# Spam Protection and massive email activity detection (optional) - SMTP Settings#
CSF can help you to secure spam abuse vector and detect suspicious email activities.
Set "SMTP_BLOCK" to "1" in "SMTP Settings" section.
Set "LF_SCRIPT_LIMIT" to "250" to identify scripts sending out 250 emails messages in an hour.
Set "LF_SCRIPT_ALERT" to "1" to send an email alert to the system administrator when the limit configured above is reached.


# Save the configuration and confirm the firewall status #
You can save the configuration by clicking the "Change" button at the end of the page. Then restart csf/lfdservice.


Thereafter, go back in the ConfigServer Security Firewall main page.
On the top of this page, you should see "Firewall Status: Enabled but in Test Mode"
If you see "Firewall Status: Disabled and Stopped" please click on "Enable".
On the top of this page, you should see "Firewall Status: Enabled but in Test Mode"
If you see "Firewall Status: Disabled and Stopped" please click on "Enable".
3. Confirm the configuration and remove the "Testing mode".
Once you are satisfied with the configuration and confirmed that it is working fine, you need to remove the "Testing mode".
Go back in the "Firewall Configuration ("csf - ConfigServer Firewall" section)
Go back in the "Firewall Configuration ("csf - ConfigServer Firewall" section)
Set "TESTING" to 0

Save this modification by clicking the "Change" button at the end of the page and restart csf/lfd service.
4. Monitor the firewall activity
You can monitor the firewall activity by clicking the "Watch system Logs" button on the ConfigServer Security Firewall main page.

Or read the log file /var/log/lfd.log which is accessible via SSH.
Wednesday, January 16, 2019
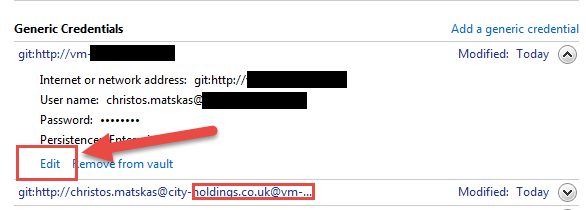
update your Git credentials on Windows
To update your credentials, go to Control Panel -> Credential Manager -> Windows Credentials ->Generic Credentials. Find the credentials related to your git account and edit them to use the updated passwords as per the image below:
Subscribe to:
Posts (Atom)