Setting up Environment Variables in MacOS Sierra
An
environment variable in a named object containing data which can be
used by multiple applications or processes. Basically, it is just a
variable with a name and an associated value. It can be used to
determine anything like location of executable files, libraries, current
working directory, default shell, or local system settings.
For
those new to mac can get overwhelmed with how to set up and manage
these environment variables. This guide provides easy ways to do so.
Displaying current Environment Variables
This is very easy. Just open the Terminal and run the command
printenv as shown below.HIMANSHUs-MacBook-Pro:~ himanshu$ printenv
JAVA_HOME=/Library/Java/JavaVirtualMachines/jdk1.8.0_131.jdk/Contents/Home
TERM_PROGRAM=Apple_Terminal
SHELL=/bin/bash
...
This will list all the environment variables currently set.
However, for displaying the value of any specific environment variable run the
echo $[variable name] on the terminal, as shown below.HIMANSHUs-MacBook-Pro:~ himanshu$ echo $JAVA_HOME
/Library/Java/JavaVirtualMachines/jdk1.8.0_131.jdk/Contents/Home
Setting temporary environment variable using terminal
If
the environment variable you wish to set is to be used once or twice,
you would like to set a temporary variable for it, avoiding unwanted
variables staying in the system. You can do this simply by opening the
terminal and running
export command followed by the variable name and its value.HIMANSHUs-MacBook-Pro:~ himanshu$ export JAVA_HOME=/Library/Java/JavaVirtualMachines/jdk1.8.0_131.jdk/Contents/Home
The above example sets the variable
$JAVA_HOME
to the specified value. However, if your requirement is to append a
value to an existing environment variable, then assign the value asexport [existing_variable_name]=[new_value]:$[existing_variable_name]
the ‘:’ here append the value to the existing value. See example below.
HIMANSHUs-MacBook-Pro:~ himanshu$ export PATH=/Users/himanshu/Documents/apache-maven-3.5.0/bin:$PATH
Setting permanent environment variable using terminal
Since Mac uses bash shell, so the environment variables can be added to the
.bash_profile directory, for the current user. The path to this file can be found using the commandHIMANSHUs-MacBook-Pro:~ himanshu$ ~/.bash_profile
Get
started by opening this file using a text editor. I’m using nano — a
terminal based text editor, you may use any text editor you like — to
open the file and edit it.
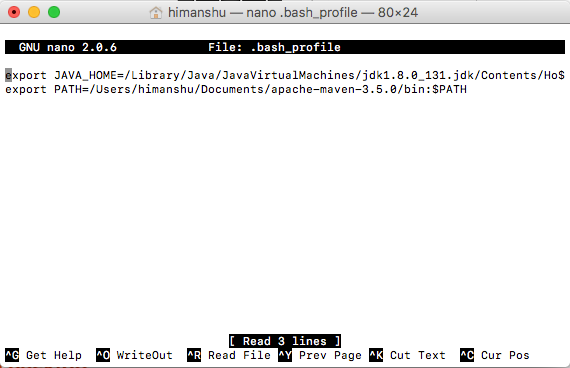
HIMANSHUs-MacBook-Pro:~ himanshu$ nano .bash_profile
This will open the
.bash_profile file in the terminal.
Note: If there is no file named
.bash_profile, then this above nano command will create a new file named .bash_profile .
Now move to the end of the file, go to the next line. Now add the desired environment variables using
export command as we did before.
Press
ctrl+X to exit the editor. Press ‘Y’ for saving the buffer, and you will return back to the terminal screen.
We are done now!
You may again run
echo $[variable_name] to see the value of your just saved environment variable.
UPDATE:
Don’t forget to close and reopen the terminal before using your newly
set environment variable. Reopening the terminal loads the
updated .bash_profile file.
No comments:
Post a Comment