1) unsplite street to remove segment, (no advance license, can't use this tool)
alternative is use dissolve tool (data management > generalization > dissovle)

check unsplit lines,
uncheck create multipart features,
dissolve field, by street name.
2) analysis tool > over lay > intersect
Run Intersect tool on a polyline feature class itself; specify POINT as Output Type. This will give you duplicated points at intersections only (not dangles).

3) Run Delete Identical tool on the points, specify SHAPE field. Now you should have ONE point at each intersection.(no license)
alternative is use Qgis, menu > MMQgis > modify > delete duplicate geometries
4) run spatial join (analysis tool > over lay > spatial join)
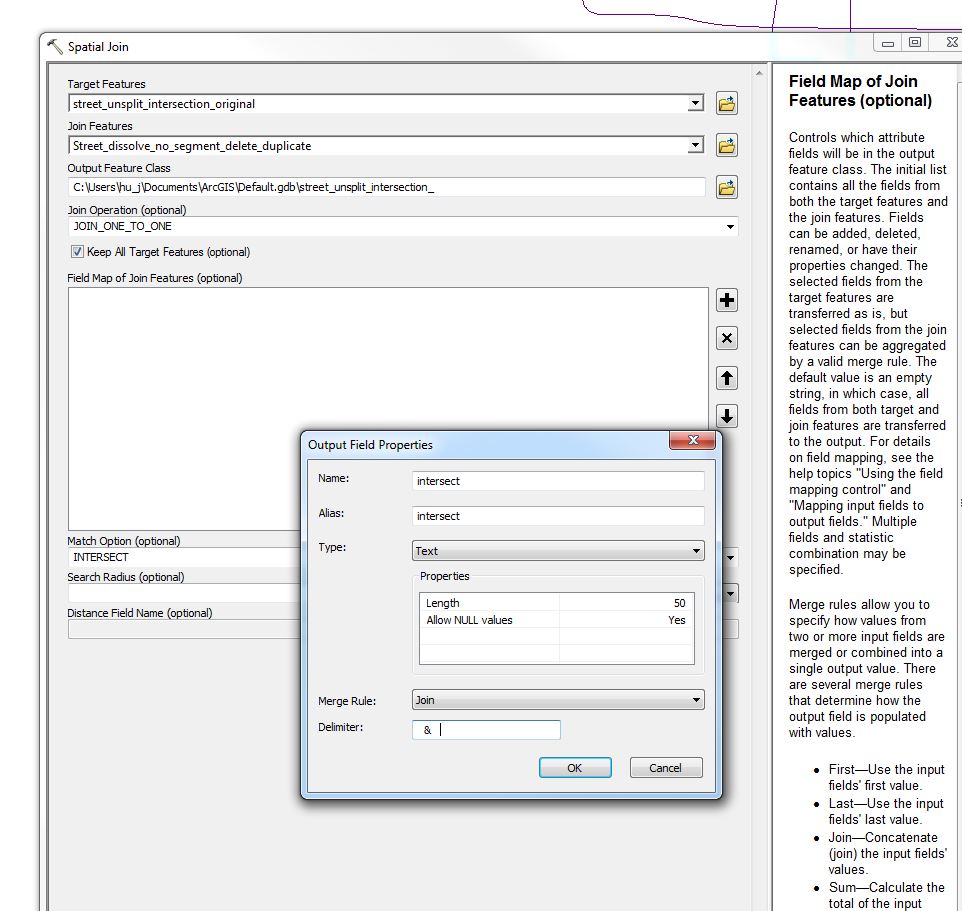
add output field, merge rule: join, delimiter: " & "
match option: intersect.
Detail see below blog
5) now you have a field named 'intersection' as "streetA & streetB & streetC"
you want to use vbscript to split by & into array.
for street 1:
pre-logic script code:
a = Split([inter], "&")
str_1 =
a(0)

for street 2:
pre-logic script code:
--------------------------------
a = Split([inter], "&")b = UBound(a)
If b>0 Then
st2 = a(1)
Else
st2 = ""
End If
------------------------------
str_2 = st2
--------------------------------------
for street 3:
pre-logic script code:
----------------------------------------
a = Split([inter], "&")b = UBound(a)
If b>1 Then
st3 = a(2)
Else
st3 = ""
End If
-------------------------------------------------
str_3 = st3
---------------------------------------------------------
for street 4:
=======================
a = Split([inter], "&")b = UBound(a)
If b>2 Then
st4 = a(3)
Else
st4 = ""
End If
=============
for street 5:
=================
b = UBound(a)
If b>3 Then
st5 = a(4)
Else
st5 = ""
End If
====================
6) create 2 street intersection file, one with field a street and b street, another one with field reverse as b street and a street.
file:
Street_intersect_a&b , intersect = [str_1] + " & " + [str_2]
file:
Street_intersect_b&a , intersect = [str_2] + " & " + [str_1]use append point feature to combine above 2 files.
data management tool --- general ----- append
+++++++++++++++++++++++++++++++++++++++++++++++++++++++++++++++++++++
https://blogs.esri.com/esri/arcgis/2013/02/11/streetintersectionlist/
===============================================================
If you work in local government, your GIS shop is most likely responsible for maintaining a street centerline database. And if you’re the keeper of the street centerline database, you’ve probably had requests to create a street intersection list—a point feature class with attributes that list the names of the cross-streets. Typical uses for a street intersection list is inventory, inspection, and management of signs and other assets, as well as for input to E911 systems. They are also useful for quality assurance of the street centerline database.
Creating a street intersection list is an interesting exercise in overlaying mixed feature types, in this case points and lines, as well as dealing with one-to-many relationships, so I thought it worthwhile to work through the steps as part of this series of blogs about overlay.
Download
You can download the data and models used in this post here.
Strategy
The basic strategy is to first create a feature class of points where streets intersect. Then, using some sort of spatial search, construct a list of all the street names connected to each point. The last step can be done using the Spatial Join tool (in previous posts, I showed how to use Spatial Join and its Field Map parameter to create such an attribute, and I’ll use the same technique here).
For my first attempt at creating a point feature class, I used the Feature Vertices To Point tool, which seems to be the favorite starting point according to most message boards. Feature Vertices To Point creates a point for the first and last vertex of every street feature. The problem with this method is that it resulted in many more points than I needed. For example:
- One point is created for each line connected at an intersection. That means for a four-way intersections, four identical points are created where only one is needed. These extra points just get in the way and can slow down processing.
- Points are created at the ends of dead-end streets, and I’m not interested in dead-ends since they aren’t intersections—there’s only one connected street.
- Finally, points are created where two street features with the same name connect. This splitting of street features is typically due to an attribute change, such as a disconnect in address ranges as shown here, or a change in road class or some other non-name attribute.
The term I use for these intersections is ‘pseudo-junction’. Since the street name doesn’t change at these pseudo-junctions, I’m not interested in them either. (The split is hardly ever due to a change in street name—except here in Redlands where we seem to have lots of streets that change names for no apparent reason.)
Although the Feature Vertices To Point method gave me a starting set of points, I wanted a method that gave me a smaller starting set and less artifacts (dead-ends and pseudo-junctions).
Unsplitting lines
The first step is to run the Unsplit Line tool using the street name field for the Dissolve Field parameter. Unsplit Line merges connected line features with the same street name, as shown below, where the red points represent the endpoints of the line features. The output has far fewer line segments then the input, and pseudo-junctions are removed.

Create intersections using the Intersect tool
The output of Unsplit Line is input to the Intersect tool, as shown in the model snippet below. Intersect creates points where line segments touch.

- When Intersect is run with one input feature class, the feature class is intersected with itself. You don’t need to (or want to) input the same feature class twice.
- The Output type is POINT, meaning that the output features are points created where two streets intersect. The default value forOutput type is INPUT, and if you specify INPUT, the output will be an empty line feature class.
- In this instance, the JoinAttributes is set to ONLY_FID, meaning that no attributes from the input features will be carried to the output feature class.
Removing duplicates

The output of Intersect is a feature class with duplicate points at every intersection. Note that there are no points created for dead-ends, nor are there any pseudo-junctions. To remove the duplicates, keeping only one of the duplicate points, use the Delete Identical tool as shown in the model snippet below. For the Fields(s) parameter in Delete Identical, use the Shape field. This deletes all but one of the points that share the same x,y location. (The Delete Identical tool requires an Advanced license. If you don’t have Advanced, use the Collect Events tool instead.)
Finding the intersecting streets with Spatial Join
The next step is to use the Spatial Join tool to create an attribute on the intersection points that lists all the streets that connect to the intersection.

This usage of Spatial Join depends upon defining a new output field (“Names”) in the Field Map of Join Features parameter. The first thing to do is to remove all the input fields from the Field Map control by highlighting the field and clicking the remove button. Then follow these steps, all illustrated below.
- Right-click within the Field Map control and choose Add Output Field. The Output Field Properties dialog box opens.
- In the Output Field Properties dialog box, name the field “Names”. Do not use the same name as your input street name field (the one used in the Unsplit Lines tool). Choose Text for the Type of field, make its Length big enough to hold the concatenated field names (I chose 80). Choose Join for the Merge Rule and provide a delimiter ‘ & ‘ (space/ampersand/space). Click OK.
- The field map will show this new output field. You now have to tell it what fields you want to join by right-clicking Names and choosing Add Input Field. This opens the Add Input dialog box.
- In the Add Input dialog box, select the street name field (FULLNAME) and click OK. The field map will now show the new field along with the input field that will create the values for the new field.
- For the Join Operation parameter, choose JOIN_ONE_TO_ONE. For the Match Option, choose INTERSECT or WITHIN_A_DISTANCE. For either option, you can specify a Search Radius. One meter is plenty.

The output of Spatial Join is shown below. For each point, the intersecting streets are found in the Names attribute, each street separated by the delimiter (an ampersand ‘ & ‘ in this case). The Spatial Join tool creates the Join_Count attribute for you. This is the count of intersecting streets.

Exploring the results
 The output of Intersect is a multipoint feature class, meaning that one feature can contain more than one point. The majority of the intersections have just one point, but if a feature contains more than one point, it means that the streets intersect more than once, as shown in the figure to the left.
To find features with more than one point, use the Add Field tool to add an integer field, and use the Calculate Field tool with the following expression to find the number of points in the multipoint:
!shape.partcount!

Any feature with two or more parts is a loop. The figure to the right shows the Calculate Field dialog. I named my field NumberOfIntersections. To display loops, I select intersections where NumberOfIntersections is greater than one.
Finding potential errors
The intersection features can help you find potential errors in the street features. For example, the map below shows an apartment complex where all the streets are named SUNRISE. This may or may not be a street name coding error, but to find these intersections and review them, you need a better way then visually scanning the table looking for issues.

 To facilitate finding errors, I calculated a new field, StreetCount, containing the number of unique street names at an intersection.
The expression for Calculate Field is:
getLength(!Names!)
The getLength() routine code is as follows:
1
2
3
4
5
6
7
8
9
10
11
12
| def getLength(inNames): # Create a list (array) by splitting the string on its delimiter # asList = inNames.split(" & ") # Use the set operator to create a new list with unique names # uniqueList = set(asList) # Return the number of entries in the set # return len(uniqueList) |
To find potential issues, select records where StreetCount is not equal to Join_Count, as shown below. Join_Count is the number of intersecting features while StreetCount is the number of unique street names. It they’re not equal, then there are multiple features with the same name at the intersection and I need to investigate further.

Ramps and limited access highways
You probably don’t want to create intersections where surface streets cross limited access highways, or where ramps connect limited access highways and surface streets. You can avoid processing these streets by selecting just those centerlines you’re interested in, as shown in the model snippet below.

This entry was posted in Analysis & Geoprocessing and tagged delete identical, intersect, intersecting street names, road centerlines, Spatial Join, street intersections, street name errors, unsplit line. Bookmark the permalink.
